1.3 Airwork 1
Categories:
For a live overview of my flight lessons, visit: https://flighttools.justinverstijnen.nl/flightlessontracker
This page can contain a collection of personal notes, steps to remember, finished and unfinished content. Please excuse brevity.
Do not use specific information given like fuel flow, landing/take-off distances for your flights. Always refer to the POH of your exact plane for flight preparation. My information is just for references that I used.
Lesson 1.3 – Airwork 1 Date: 22-08-2025
In this flight, I learned how to perform the preflight inspection myself by doing the walk‑around using a structured checklist.
In this first checklist item, we look for reasons not to fly.
In IT terms, this can be compared to a physical risk assessment.
I had to repeat this with more steps and will do this every lesson to fully master the procedure.
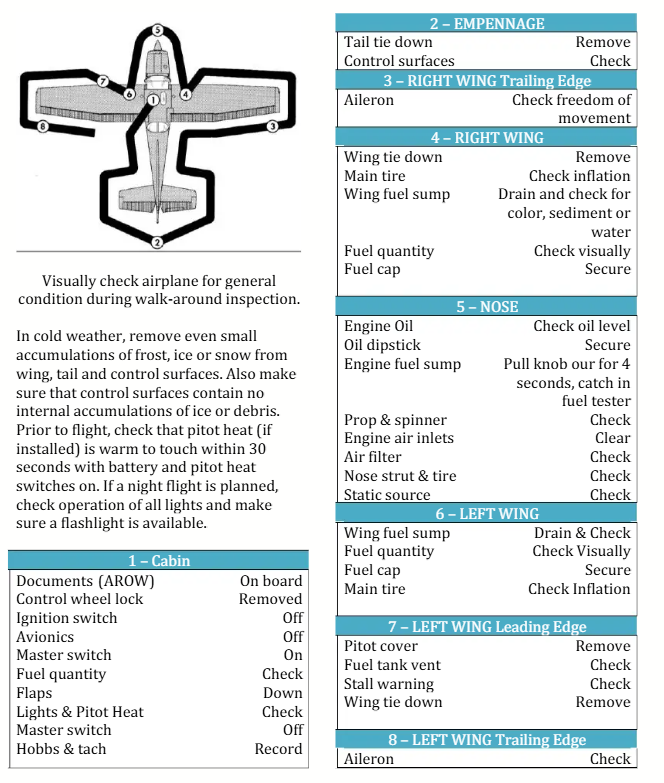
I performed the check as follows:
Cabin
- Remove the control wheel lock (steering lock)
- Check fuel quantity from the gauges (not fully trustworthy)
- Test flap movement from 0° to full 40°
- Check lights and pitot heat (especially relevant at 10°C and below)
Tail
- Check elevator freedom and correct response to yoke movement
- Remove tail tie‑downs (extra weight)
Right wing
- Check flap condition
- Check aileron movement for freedom and correctness
Right wheel & fuel
- Check tire, brakes, and strut
- Measure fuel manually using a dipstick
- Check for water contamination in the fuel
Nose
- Check oil level (minimum 5 quarts, 6 for longer flights)
- Check propeller condition and freedom
- Check air inlets for contamination
- Inspect static pressure port (used to measure altitude in hPa)
Left wheel & wing
- Same checks as right side
- Drain fuel sump to check for dirt or water
- Inspect front tire and brake
Pitot & stall warning
- Check pitot probe (indicated airspeed)
- Check analog stall warning (testable using suction)
Left aileron & flap
- Verify free movement
- Confirm correlation with yoke movement
Aileron movement reminder
Steering left → left aileron up, right down
Steering right → right aileron up, left down
Wing going up produces more lift
Wing going down produces more drag
Trip fuel and fuel calculation
When fueling the aircraft, we must ensure enough fuel for every possible phase of the flight.
Fuel is not only for A → B — weather or runway issues might force a diversion.

Fuel planning includes:
- Taxi fuel
- Trip fuel
- Contingency fuel
- Alternate fuel
- Final reserve fuel
- Possible extra fuel
The final reserve fuel (30–45 minutes) must never be used.
Using it means the flight planning was insufficient.
Always filling tanks to the maximum may feel safe, but more fuel means:
- More weight
- Higher fuel consumption
- Reduced performance
- Less room for passengers or baggage
Fuel consumption is calculated using data from the Pilot Operating Handbook (POH).
Aircraft forces
An aircraft is influenced by four main forces:
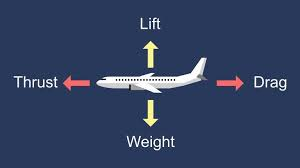
- Lift – Force generated by the wings to keep the aircraft airborne
- Drag – Opposing force slowing the aircraft
- Weight / Gravity – Pulls the aircraft toward the ground
- Thrust – Generated by the engine and propeller
In straight and level flight, all four forces are in balance:
- Lift balances weight
- Thrust balances drag
Flying visually
In this lesson, I learned to fly more visually by focusing on nose attitude instead of instruments alone.
This greatly helps maintaining a stable speed and altitude.
Maintaining direction
When flying straight or during turns:
- Pick a reference point far away (city, lake, building)
- Fly towards that point
Maintaining altitude
Focus on how the horizon sits over the nose:
- This visual reference quickly shows climbs or descents
- Reduces reliance on instruments
Carburetor heat
The carburetor mixes air and fuel.
Because intake air cools inside the carburetor, engine RPM drops (±150 RPM).
General rule:
- Use carb heat whenever possible
- Disable only when maximum power is needed
Usage:
- Take‑off & climb: Carb heat OFF (cold)
- Cruise: Carb heat ON
Carburetor icing can occur even on warm days.
Ice formation is detected by a rise in RPM when carb heat is applied.
Remember:
“No rise, no ice.”
Slow Flight
Due to spare time, we practiced slow flight again.
By extending flaps, we increase lift and drag, allowing slower flight speeds — the reason flaps are used during landing.
Slow flight is also used in the circuit:
- Allows tighter turns
- Prevents overshooting
- Gives more time for radio calls and checks
In slow flight, control dynamics change:
- Altitude → Throttle / RPM
- Speed → Nose attitude
- Direction → Rudder
End of the page 🎉
You have reached the end of the page. You can navigate through other blog posts as well, share this post on X, LinkedIn and Reddit or return to the blog posts collection page. Thank you for visiting this post.
If you think something is wrong with this post or you want to know more, you can send me a message to one of my social profiles at: https://justinverstijnen.nl/about/
If you find this page and blog very useful and you want to leave a donation, you can use the button below to buy me a beer. Hosting and maintaining a website takes a lot of time and money. Thank you in advance and cheers :)

The terms and conditions apply to this post.