This category contains the details of my flight lessons, where I dive into the theory of the exercises for review and the learning processes. The lessons are categorized into phases:
Phase 1: Learning to fly
Phase 2: Learning to fly good
Phase 3: Learning to Navigate
Phase 4: Advanced lessons
Phase 1
This category contains the details of my flight lessons in Phase 1, where you learn to fly.
1.1 Basics
In my first flight lesson for my Private Pilot Lesson, I have been introduced to multiple aspects of flying. In the past, around 3 years before this first PPL lesson, I did a trial lesson where I only controlled the plane at around 2500 feet, but only controlled the yoke, rudder pedals and trims.
This page can contain a collection of personal notes, steps to remember, finished and unfinished content. Please excuse brevity.
Do not use specific information given like fuel flow, landing/take-off distances for your flights. Always refer to the POH of your exact plane for flight preparation. My information is just for references that I used.
Introduction
Lesson number
Lesson name
Lesson date(s)
1.1
Basics
25-07-2025
In my first flight lesson for my Private Pilot License journey. I have been introduced to multiple aspects of flying. In the past, around 3 years before this first PPL lesson, I did a trial lesson where I only controlled the plane at around 2.500 feet, but only controlled the yoke, rudder pedals and trims.
This lesson it was the first time after around 300 hours of Microsoft Flight Simulator (Haha) where I controlled the plane for the full flight except the landing phase. In the PPL learning curve, you will perform this after around 8–9 lessons when doing take-off and landing/circuit exercises from lesson 1.8.
The theory of this lesson mostly consisted of:
Flight preparation and planning
Aircraft Technical Log (ATL) and Hold Item List (HIL)
Standard Operating Procedures (SOPs)
The multiple instances
Performing a proper walkaround
Flight Preparation (ANWB)
Before we step into a plane, we are required to plan and prepare our flight. We don’t want to be unprepared when flying, and also both the pilot flying and pilot monitoring must be on the same pace.
My flight school uses the ANWB abbreviation for this:
Aircraft
NOTAMs
Weather
Briefings
In each stage we check all related things and we search for reasons or risks not to fly. ANWB is also the national traffic/roadside assistance organization so everybody from the Netherlands already knows this abbreviation.
Aircraft
In the aircraft stage we check and calculate the following things:
ABC: Departure airfield, destination and our alternate. We always must have a backup airfield.
Aircraft Technical Log (ATL):
All issues before maintenance are resolved
First flight after maintenance: flight controls and trim check are critical
Hold Item List (HIL): Flyable but inoperative items (e.g. autopilot or landing lights)
Fuel calculation: Ensure enough fuel, including reserve and alternate
Mass and Balance:
Passenger and baggage weight affect fuel capacity
Utility limits must be respected during aerobatics
NOTAMs
NOTAMs (Notice to Air Missions) contain information about possible risks, such as:
Runway closures
Military or government restrictions
High cranes or temporary obstacles
Defect obstacle lighting
ILS or VOR outages
We check NOTAMs for:
Departure airport
Destination airport
Alternate airport
En-route
Weather
Weather is one of the most unpredictable factors. We check:
SWC (Significant Weather Chart) – above 15,000 ft
LLFC (Low Level Forecast Chart) – below 15,000 ft
SIGWX
GAFOR / GLLFC
Briefings
In the briefing phase we inform crew and passengers about:
The route
Destination aerodrome
Threat and Error Management (TEM)
Questions from passengers
These were all points from the flight preparation.
Aviation Instances
In aviation, multiple organizations oversee safety and regulations:
ICAO: International procedures and recommendations
EASA: European legally binding aviation rules
LVNL: Dutch airspace authority
Performing the Pre-flight Inspection (Walk-around)
Before every flight we must perform a pre-flight inspection to avoid surprises in the air.
During the walk-around we check:
Oil leaks
Tires (grip and canvas)
Brakes
Ailerons
Rudder
Flaps
Elevator
Engine oil (min. 5 qt for C172)
Fuel quantity and water
Pitot cover removed
ATL onboard
Flight controls free and correct
⚠️ Note Pre-flight inspection steps differ per aircraft. Always refer to the official aircraft operating manual.
Starting the Aircraft
After confirming airworthiness, we proceed with engine start.
Most training aircraft have a hot prop, meaning the propeller can start the engine if the magnetos are active. This is when the key is turned to R, L, Both or Start. Therefore:
Key must be removed when outside the aircraft
Propeller rotation can power magnetos
We then:
Set seats and seatbelts
Close doors and windows
Complete Before Start checklist
Mixture full rich
Call: “On the brakes”
Start the engine
Taxiing
Taxiing is ground movement using taxiways marked with yellow center lines.
Ideal taxi speed: ~1000 RPM
Speed comparable to a light sprint
Airspeed indicator becomes active around 35–40 knots (too fast for taxi)
Run-Up (Before Take-off Checklist)
The run-up ensures engine reliability before take-off.
Engine at ~1700–1800 RPM
Test both magnetos
Burn excess fuel if needed
Bring engine to operating temperature
Before entering runway:
Transponder: ALT
Flaps: 10 degrees
Trim: Take-off position
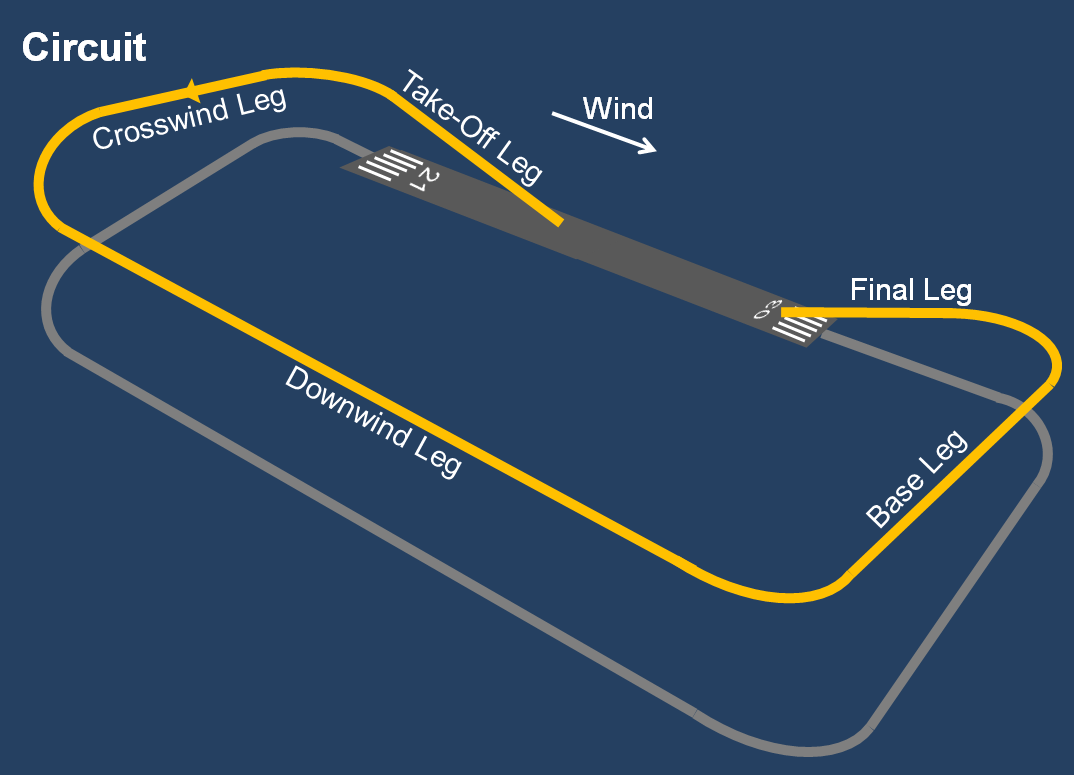
Airport Circuit
Before flying circuits (Upwind, Crosswind, Base leg), it helps to understand the pattern:
End of the page 🎉
You have reached the end of the page. You can navigate through other blog posts as well, share this post on X, LinkedIn and Reddit or return to the blog posts collection page. Thank you for visiting this post.
This page can contain a collection of personal notes, steps to remember, finished and unfinished content. Please excuse brevity.
Do not use specific information given like fuel flow, landing/take-off distances for your flights. Always refer to the POH of your exact plane for flight preparation. My information is just for references that I used.
Introduction
Lesson number
Lesson name
Lesson date(s)
1.2
Effect of controls
08-08-2025
In this lesson, we went more into the technical limitations of the Cessna 172 aircraft. Also we did some slow-flight exercises to be somewhat ahead of schedule as we had some spare time.
Limitations
The most important limitations of the Cessna 172 aircraft are:
Maximum take-off weight (2300 LBs / 1.043 KG)
Maximum Indicated Airspeed (IAS) of 140 kts (260 km/u) while flapless
Maximum Indicated Airspeed (IAS) of 85 kts (157 km/u) while full flaps (check the white arc for allowed flap speed on the airspeed indicator)
Minimum landing distance
Minimum take-off distance
To make sure we don’t exceed these limitations, we need to take several precautions. For weight, we perform a mass and balance calculation. For airspeed, we ensure during flight that we remain well below 140 knots.
For landing and take-off distance, this is ensured during flight preparation, where penalties are added for unfavorable runway or weather conditions.
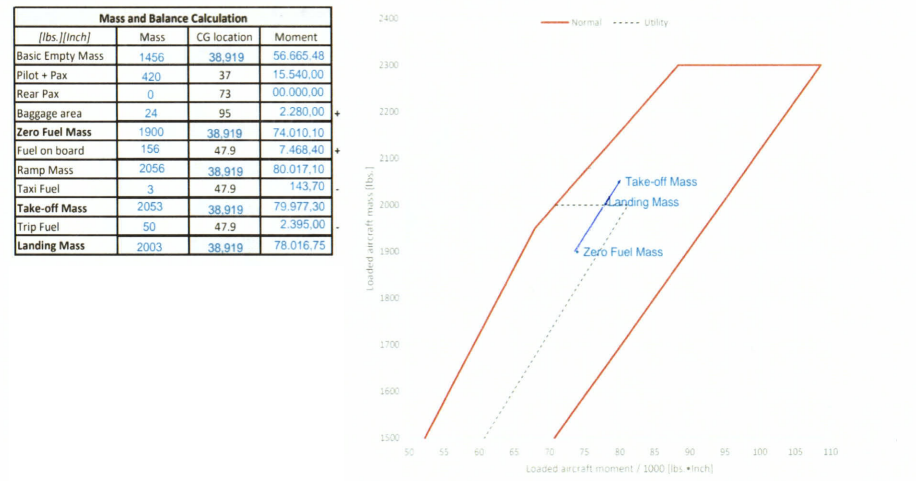
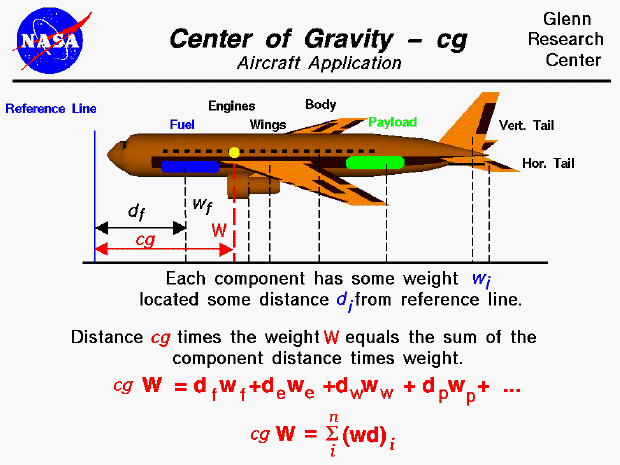
Mass and Balance sheet
Before we begin our flight, we must calculate both weight and balance. They play a critical role in aircraft performance. The total mass must always remain below the maximum take-off weight, which is specific to each aircraft type.
The root of why we calculate this before the flight is to ensure we stay within the aircrafts performance envelope and not to create imbalance. Doing this incorrectly can lead to decreased flight perforrmance and even worse results.
Here I created a mass and balance sheet for a Cessna 172, fully within the technical limits of the aircraft.
Normal category flights must stay within the red lines
Utility/aerobatic flights must stay within the grey dotted lines
The CG (Center of Gravity) is the balance point of the aircraft. You can compare it to balancing a pencil on your finger: the point where it stays perfectly balanced is the center of gravity.
In an aircraft, CG is calculated along the fuselage. For the Cessna 172 this is measured in inches. For example: a baggage CG of 95 means the weight is centered 95 inches from the front of the fuselage.
Emergency equipment
In a Cessna 172, the following 7 emergency items must always be on board:
First aid kit
Fire extinguisher
Emergency Locator Transmitter (ELT)
Radios / avionics
Transponder
Emergency checklist (QRH)
Mobile phone and emergency contacts:
FIO
ACC Supervisor
During the before‑take‑off checklist, I learned these items by heart and was told to always be aware of them.
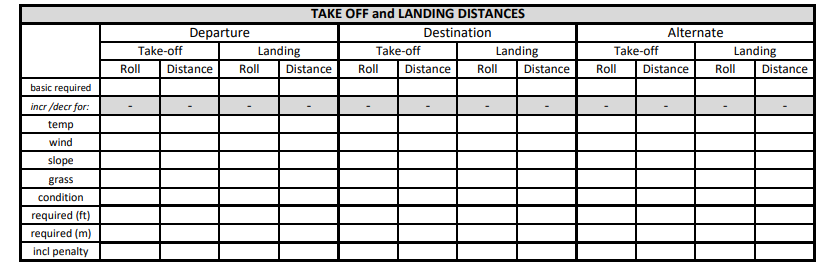
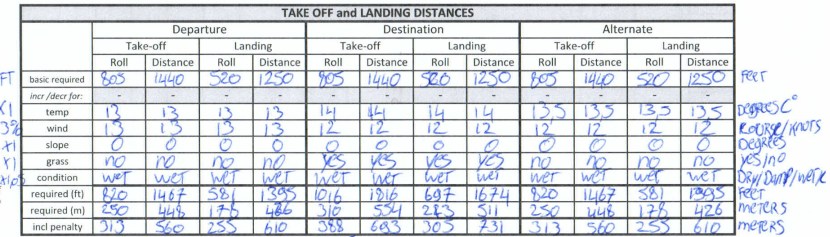
Calculating Take-off and Landing Distances
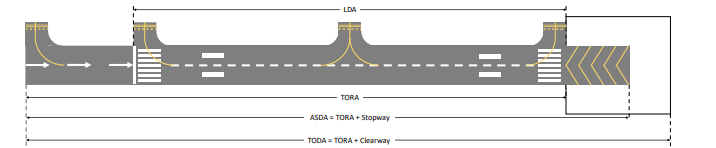
Before confirming that we can safely take off or land on a specific runway, we calculate the required distances. Runway lengths for all Dutch aerodromes can be found via the AIP:
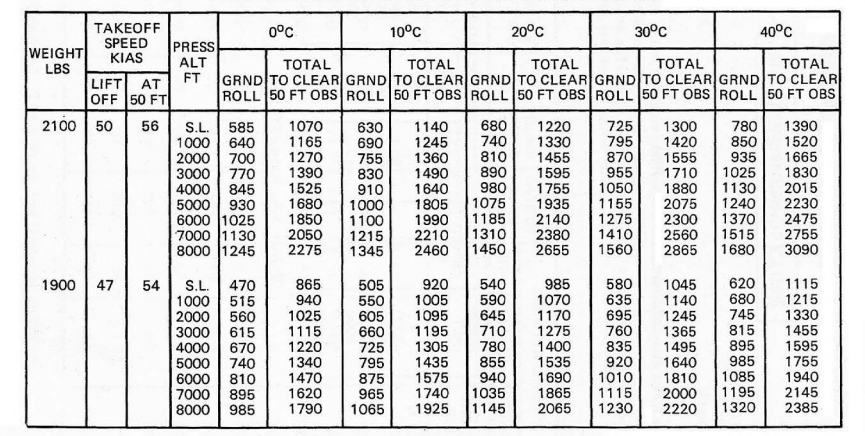
Cessna publishes the basic required take-off and landing distances in the POH (Pilot Operating Handbook):
These values assume perfect conditions: zero wind, ideal temperature, dry asphalt runway. Because this rarely happens, we apply penalties and always calculate using worst‑case scenarios.
Take-off distance penalties
Penalty description
Increase basic required take‑off distance
Every 100 ft aerodrome elevation above AMSL
+1%
Every °C above OAT
+1%
Headwind (per knot)
−1%
Tailwind (per knot)
+20%
Runway slope (uphill, per 1%)
≥ 5%
Grass runway – dry
+25%
Grass runway – wet
+30%
Soft ground
≥ 25%
Snow
≥ 25%
Gravel
+7%
Flapless take-off
+60%
This prevents discovering at 45 knots that the runway is too short. Worst‑case thinking is essential.
Landing distance penalties
Penalty description
Increase basic required landing distance
Every 100 ft aerodrome elevation above AMSL
+0.5%
Every °C above OAT
+0.5%
Headwind (per knot)
−1%
Tailwind (per knot)
+20%
Runway slope (downhill, per 1%)
≥ 5%
Grass runway – dry
+30%
Grass runway – wet
+38%
Soft ground
≥ 25%
Snow
≥ 25%
Gravel
+7%
Flapless landing
+60%
Always verify the Landing Distance Available (LDA) — the space between the white runway stripes. Do not confuse this with TORA or TODA, which apply to take‑off.
Runway surface conditions
There are four runway surface conditions:
Dry – Best braking and performance
Damp – Slightly moist, not shiny
Wet – Shiny runway, water < 3 mm
Contaminated – Water > 3 mm or snow
Always assess the worst section of the runway. If 1100 m is dry but 400 m is wet, the runway is considered wet.
Example of my flight preparation
After lesson 2, I prepared a full fictional flight to practice all calculations:
I used worst‑case values and rounded everything up when converting from feet to meters. (Please ignore the handwriting 😄)
Slow Flight
We finished the lesson with slow‑flight exercises. Slow flight is the art of controlling the aircraft at low airspeeds. Less airflow means less control authority.
As airspeed decreases, lift decreases. To compensate, we must increase the angle of attack by raising the nose.
Aircraft control in slow flight (~60 knots):
Direction / heading": Rudder
Airspeed: Elevator
Altitude: Throttle
We also practiced with flaps extended, which increases lift and makes slow flight easier.
Finishing up
After completing the exercises, we returned to the airstrip for a smooth landing and taxied back to the flight school.
End of the page 🎉
You have reached the end of the page. You can navigate through other blog posts as well, share this post on X, LinkedIn and Reddit or return to the blog posts collection page. Thank you for visiting this post.
This page can contain a collection of personal notes, steps to remember, finished and unfinished content. Please excuse brevity.
Do not use specific information given like fuel flow, landing/take-off distances for your flights. Always refer to the POH of your exact plane for flight preparation. My information is just for references that I used.
Introduction
Lesson number
Lesson name
Lesson date(s)
1.3
Airwork 1
22-08-2025
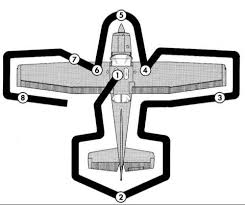
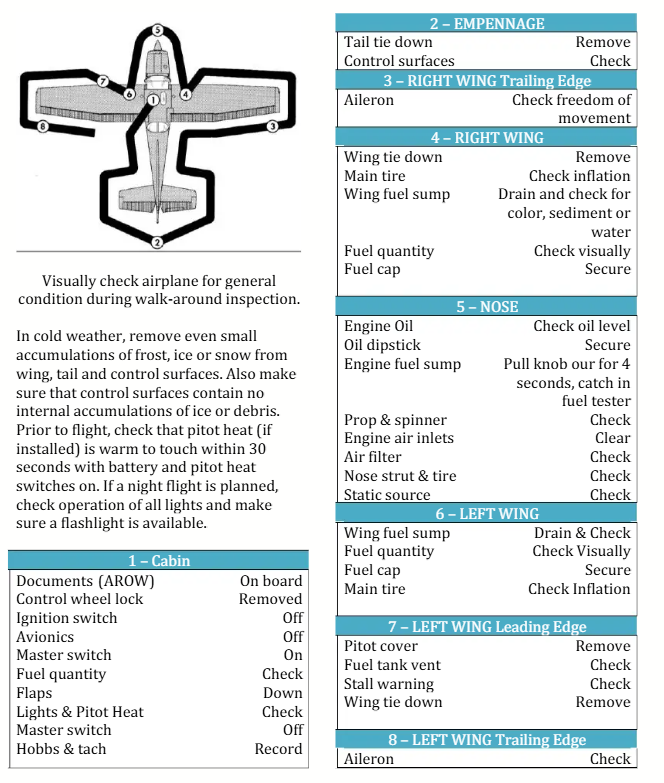
In this flight, I learned how to perform the preflight inspection myself by doing the walk‑around using a structured checklist. In this first checklist item, we look for reasons not to fly. In IT terms, this can be compared to a physical risk assessment.
I had to repeat this with more steps and will do this every lesson to fully master the procedure.
I performed the check as follows:
Cabin
Remove the control wheel lock (steering lock)
Check fuel quantity from the gauges (not fully trustworthy)
Test flap movement from 0° to full 40°
Check lights and pitot heat (especially relevant at 10°C and below)
Tail
Check elevator freedom and correct response to yoke movement
Remove tail tie‑downs (extra weight)
Right wing
Check flap condition
Check aileron movement for freedom and correctness
Right wheel & fuel
Check tire, brakes, and strut
Measure fuel manually using a dipstick
Check for water contamination in the fuel
Nose
Check oil level (minimum 5 quarts, 6 for longer flights)
Check propeller condition and freedom
Check air inlets for contamination
Inspect static pressure port (used to measure altitude in hPa)
Left wheel & wing
Same checks as right side
Drain fuel sump to check for dirt or water
Inspect front tire and brake
Pitot & stall warning
Check pitot probe (indicated airspeed)
Check analog stall warning (testable using suction)
Left aileron & flap
Verify free movement
Confirm correlation with yoke movement
Aileron movement reminder
Steering left → left aileron up, right down
Steering right → right aileron up, left down
Wing going up produces more lift
Wing going down produces more drag
Trip fuel and fuel calculation
When fueling the aircraft, we must ensure enough fuel for every possible phase of the flight. Fuel is not only for A → B — weather or runway issues might force a diversion.
Fuel planning includes:
Taxi fuel
Trip fuel
Contingency fuel
Alternate fuel
Final reserve fuel
Possible extra fuel
The final reserve fuel (30–45 minutes) must never be used. Using it means the flight planning was insufficient.
Always filling tanks to the maximum may feel safe, but more fuel means:
More weight
Higher fuel consumption
Reduced performance
Less room for passengers or baggage
Fuel consumption is calculated using data from the Pilot Operating Handbook (POH).
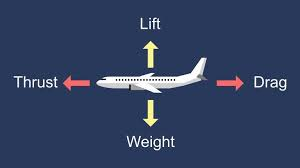
Aircraft forces
An aircraft is influenced by four main forces:
Lift – Force generated by the wings to keep the aircraft airborne
Drag – Opposing force slowing the aircraft
Weight / Gravity – Pulls the aircraft toward the ground
Thrust – Generated by the engine and propeller
In straight and level flight, all four forces are in balance:
Lift balances weight
Thrust balances drag
Flying visually
In this lesson, I learned to fly more visually by focusing on nose attitude instead of instruments alone. This greatly helps maintaining a stable speed and altitude.
Maintaining direction
When flying straight or during turns:
Pick a reference point far away (city, lake, building)
Fly towards that point
Maintaining altitude
Focus on how the horizon sits over the nose:
This visual reference quickly shows climbs or descents
Reduces reliance on instruments
Carburetor heat
The carburetor mixes air and fuel. Because intake air cools inside the carburetor, engine RPM drops (±150 RPM).
General rule:
Use carb heat whenever possible
Disable only when maximum power is needed
Usage:
Take‑off & climb: Carb heat OFF (cold)
Cruise: Carb heat ON
Carburetor icing can occur even on warm days. Ice formation is detected by a rise in RPM when carb heat is applied.
Remember:
“No rise, no ice.”
Slow Flight
Due to spare time, we practiced slow flight again. By extending flaps, we increase lift and drag, allowing slower flight speeds — the reason flaps are used during landing.
Slow flight is also used in the circuit:
Allows tighter turns
Prevents overshooting
Gives more time for radio calls and checks
In slow flight, control dynamics change:
Altitude → Throttle / RPM
Speed → Nose attitude
Direction → Rudder
End of the page 🎉
You have reached the end of the page. You can navigate through other blog posts as well, share this post on X, LinkedIn and Reddit or return to the blog posts collection page. Thank you for visiting this post.
This page can contain a collection of personal notes, steps to remember, finished and unfinished content. Please excuse brevity.
Do not use specific information given like fuel flow, landing/take-off distances for your flights. Always refer to the POH of your exact plane for flight preparation. My information is just for references that I used.
Introduction
Lesson number
Lesson name
Lesson date(s)
1.4
Airwork 2
02-09-2025
We started by reviewing previous material and then went deeper into the theory of a nose attitude. During the flight we practiced slow flight, throttle effects on nose attitude, gliding, and trimming.
First, we discussed some theory.
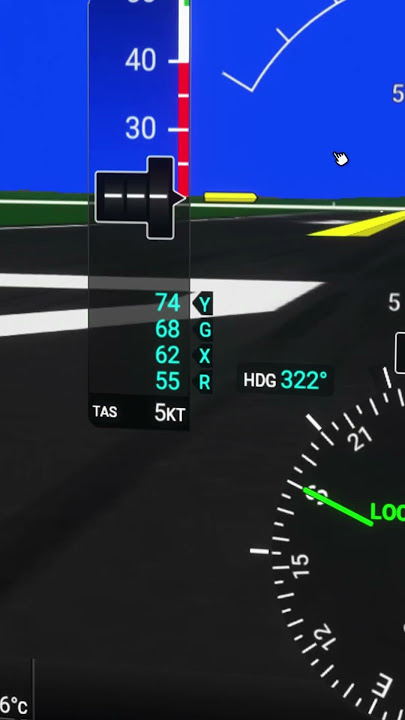
At take-off, we use different speeds for different phases:
Vr – Rotation speed
In a Cessna 172: ~55 knots (102 km/h)
Vx – Best angle of climb (maximum altitude gain for distance)
In a Cessna 172: ~65 knots (120 km/h)
Vy – Best rate of climb (maximum altitude gain for time)
In a Cessna 172: ~75 knots (139 km/h)
Vg – Best glide speed (engine failure)
In a Cessna 172: ~65–68 knots (124 km/h)
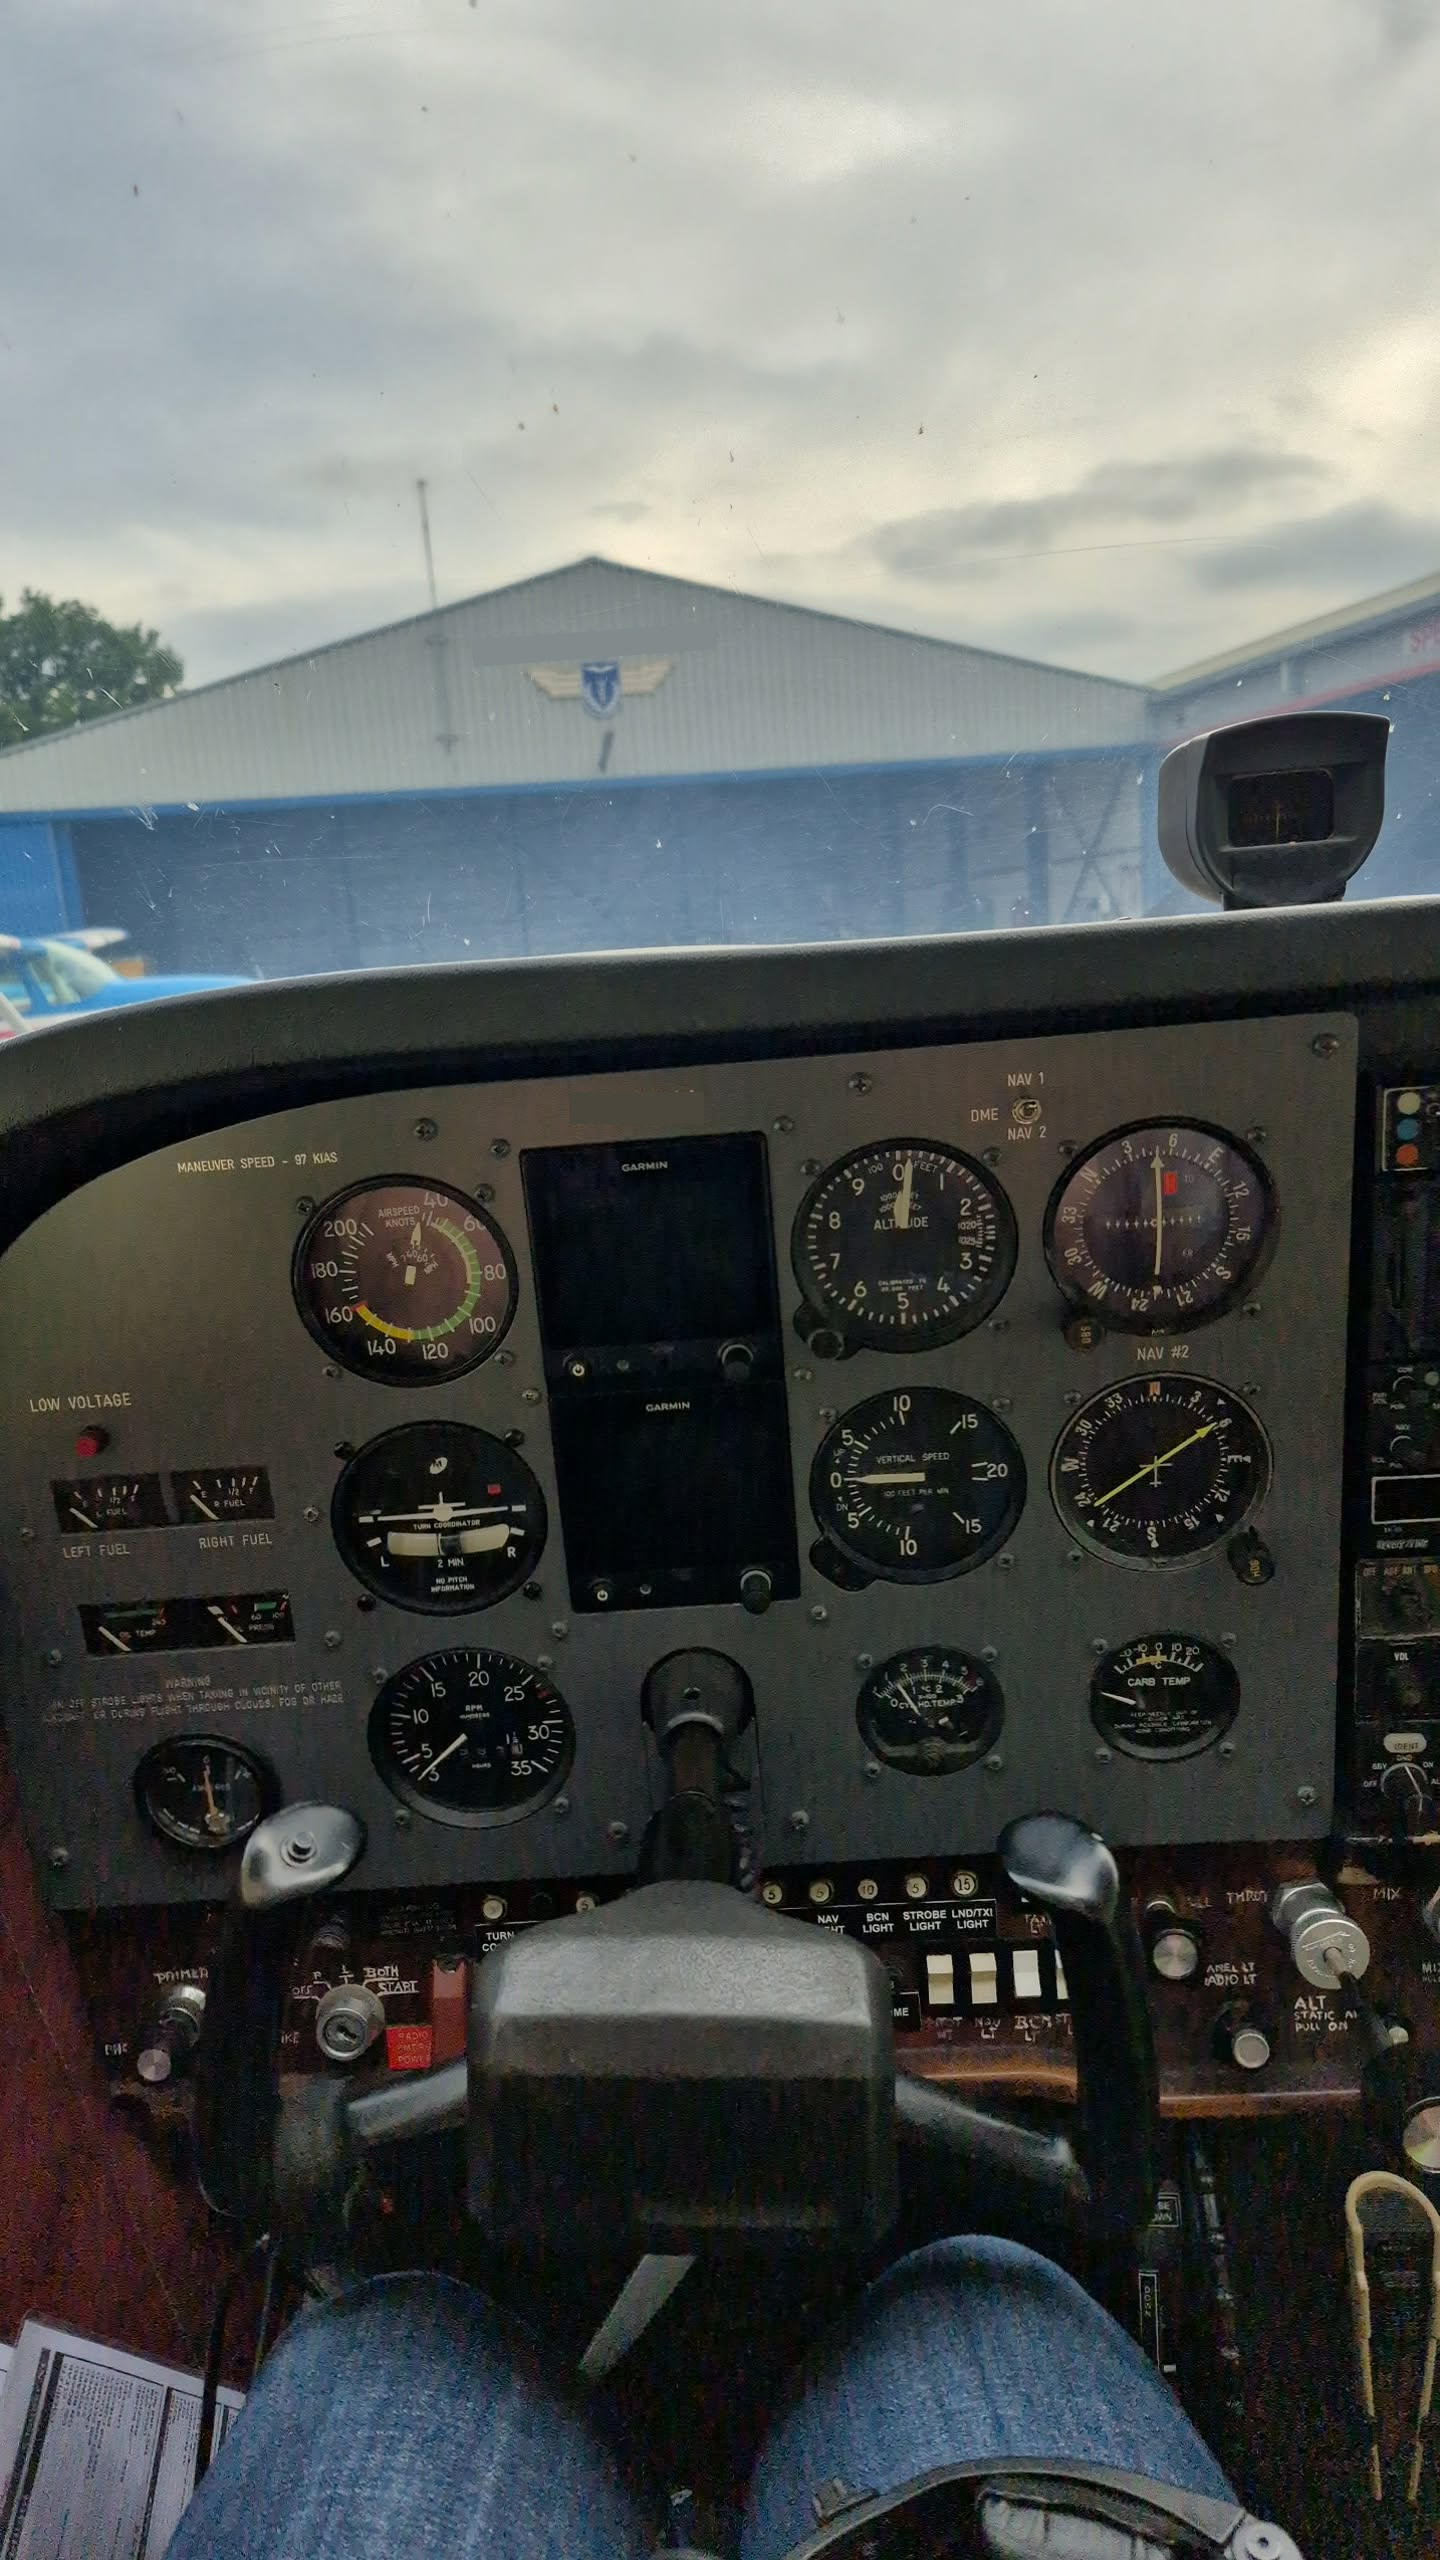
These speeds are marked on the Garmin G1000 primary flight display:
And they correspond to the take‑off phase like this:
During take-off:
We rotate at Vr (55 kts) to lift the aircraft off
We initially climb at Vx (65 kts) to clear obstacles
After ~200 ft AGL, we perform the after take‑off checklist:
Flaps up
Climb at Vy (75 kts)
Effect of throttle and the nose
Throttle input directly affects nose attitude:
More throttle / RPM → Nose rises
Less throttle / RPM → Nose lowers
When trimming and stabilizing the aircraft, throttle can be used to help level off and maintain a steady attitude.
Gliding
During descent from approximately 2000 ft to 700 ft, we performed a glide.
Normal descent: ~1800 RPM
Glide: Engine at idle
While gliding, we trimmed the aircraft with a slightly nose‑up attitude. This resulted in minimal engine noise and was a great exercise for understanding glide paths during engine failure scenarios.
Trimming
Trimming is essential for stable, level flight. It means correcting pitch for a specific combination of throttle, altitude, pressure, and speed.
A correctly trimmed aircraft maintains altitude without continuous control input.
Procedure:
Reach the desired altitude
Correct with the yoke (push or pull)
Trim away the yoke force by trimming nose up or down
Trim logic:
Trim down: Turn the trim wheel up
Trim up: Turn the trim wheel down
Although this feels counter‑intuitive, it mirrors the direction you would move the yoke.
Briefings
We practiced creating standardized briefings following the principle:
Say what you do, do what you say
Taxi Briefing
Mention taxiways
Mention hotspots
Stay clear of taxiway centerline to avoid “chimneys”
Check turn coordinator, compasses, and attitude indicator by steering right, then left
Park the aircraft at a 45° angle to the runway for run‑up
Departure Briefing
State the departure runway
Mention base leg and final checks
Confirm full throttle on take-off
Engine failure or fire with runway remaining
Including failures before rotation speed
Engine failure or fire without runway remaining
Forced landing
State Vr, Vx, Vy (55 / 65 / 75)
At 200 ft:
Flaps up
Climb to 700 ft
Leave circuit at 45° (e.g. 305° for RWY 26, 225° for RWY 18)
The flight details
End of the page 🎉
You have reached the end of the page. You can navigate through other blog posts as well, share this post on X, LinkedIn and Reddit or return to the blog posts collection page. Thank you for visiting this post.
This page can contain a collection of personal notes, steps to remember, finished and unfinished content. Please excuse brevity.
Do not use specific information given like fuel flow, landing/take-off distances for your flights. Always refer to the POH of your exact plane for flight preparation. My information is just for references that I used.
Introduction
Lesson number
Lesson name
Lesson date(s)
1.5
Airwork 3
26-09-2025
In this lesson we performed several airwork exercises, preceded by theory briefings.
The focus was on aircraft control, procedures, and situational awareness.
Exercises covered:
Basic climbing and descending to a specific altitude
Memory items for emergency scenarios (QRH)
Taxi briefing
Take‑off briefing
Normal turns (30° bank)
Steep turns (45° bank)
Basic climbing and descending to a specific altitude
In cruise flight, we typically fly around 95 knots (175 km/h).
When climbing or descending to a new altitude, we must do this efficiently and precisely, avoiding overshooting or undershooting the target altitude.
Climbing (APT)
Important terminology- Altitude – Height above sea level (ft)- Attitude – Nose angle (pitch axis)
For a climb:
Use Vy (best rate of climb)
Cessna 172: 75 knots
Use full throttle
Carburetor heat OFF (engine is already warm at high RPM)
Climb technique:
From straight and level flight at 2000 ft:
Increase nose attitude until 75 knots
Apply full throttle
Trim as needed to reduce control pressure
50 ft before target altitude:
Reduce nose attitude to slow the climb
At target altitude:
Level off
Accelerate to ~90–95 knots
Set cruise RPM (~2300 RPM)
Descending (PAT)
Descending differs from climbing:
No additional power needed
Controlled primarily by power reduction and attitude
Descent procedure:
Carburetor heat ON
Reduce power to ~1700 RPM
Set nose attitude for descent (~500 ft/min vertical speed)
Level‑off technique:
100 ft before target altitude
Carburetor heat OFF
50 ft before target altitude
Adjust pitch and power to level flight
Resume cruise:
~95 knots
~2300 RPM
Memory items in checklists
Aircraft Quick Reference Handbooks (QRH) contain checklists for various scenarios.
Some checklist items are marked as memory items which must be known by heart, as there is no time to read during the event.
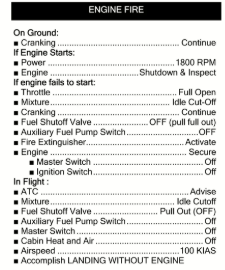
Example: Fire during start
If fire occurs during engine start:
Continue cranking for 5–10 seconds to try to suck the flames into the engine
If engine starts:
Parking brake set
1700 RPM
Prepare seatbelts, doors, fire extinguisher
Wait max. 2 minutes/120 seconds
If fire continues:
Mixture cut‑off
Throttle full open
Fuel selector OFF
Ignition OFF
Master switch OFF
If engine does not start:
Mixture cut‑off
Throttle full open
Continue cranking briefly
Ignition OFF
Master switch OFF
Fuel selector OFF (if possible)
Extinguish fire using any possible method
Memory items exist because delay can cost the aircraft and lives.
They must be learned per aircraft type.
ImportantAlways learn memory items directly from the aircraft’s Quick Reference Handbook. Procedures can differ between aircraft types and models.
Magneto check
During the Before Take‑off checklist:
Set magnetos to Right first
Back to Both
Set magnetos to Left
Back to Both
This minimizes movement:
Two counter‑clockwise
Two clockwise
One counter‑clockwise
One clockwise
Airborne checks
While airborne, perform regular checks (once or twice per minute):
Oil pressure
RPM
Engine temperatures
Vacuum gauge
Additionally:
Continuously scan for traffic using horizontal and vertical eye movement
Deviate or perform a 180° turn if traffic is at the same altitude
Be predictable, just like road traffic
Make radio contact whenever possible
Briefings
Briefings are performed at the start of each flight phase to maintain shared situational awareness and reduce surprises.
We use the ANWB structure:
Aircraft
NOTAMs
Weather
Briefing
Taxi briefing
Performed during the Before Taxi checklist.
Items to brief:
Aircraft status (defects / remarks)
Relevant NOTAMs
Weather impact
Route to run‑up area
Taxi speed and RPM
Expected turns
Instruments to check:
Turn coordinator (ball & symbol)
Gyro / magnetic compass
Heading indicator
Avoid hotspots and deviate from yellow line to avoid nose‑wheel chimneys
Effect of wind (counter‑steering)
Brake check when starting taxi
“Any questions?”
Departure briefing
Performed before take‑off.
Brief:
Runway and usable length
Flap setting (default: 10°)
Power setting
Rotation speed (55 knots)
Climb speed after 200 ft
Circuit height and exit (700 ft / 45°)
Direction of departure
Cruise altitude and speed
Emergency scenarios:
Before 55 knots
Throttle idle
Braking
Inform ATC
After 55 knots – non‑flyable
Forced landing ahead
30° left or right (wind‑dependent)
Above 1000 ft: consider turn‑back
After 55 knots – flyable
Stay in circuit at 700 ft
Full‑stop landing
Extra vigilance with gliders, parachuting or tow operations
Arrival briefing
Performed when approaching the destination airport.
Brief:
Aircraft status
Destination NOTAMs
Weather
Runway and usable landing distance
Flap setting (40°, adjust for wind)
Circuit direction
Approach speed ( 65 knots )
Go‑around procedure:
Complete circuit
Line up for another attempt
End of the page 🎉
You have reached the end of the page. You can navigate through other blog posts as well, share this post on X, LinkedIn and Reddit or return to the blog posts collection page. Thank you for visiting this post.
Slow flight and fast flight exercises focusing on aircraft control at extreme speeds, taxi checks from memory, and improvements in preparation and SOP usage.
This page can contain a collection of personal notes, steps to remember, finished and unfinished content. Please excuse brevity.
Do not use specific information given like fuel flow, landing/take-off distances for your flights. Always refer to the POH of your exact plane for flight preparation. My information is just for references that I used.
Introduction
Lesson number
Lesson name
Lesson date(s)
1.6
Slow flight
13-10-2025 & 20-10-2025
One of the harder lessons so far: slow flight. The purpose of this lesson is to fly as slowly as possible while remaining safely airborne in the Cessna 172.
The first time we flew this lesson, it did not go as planned. I lost too much altitude and controlling the aircraft was difficult, especially because the exercise had to be maintained for an extended period of time. For this reason, I had to retake the lesson.
Slow flight described
Before starting slow flight, we first scan for traffic, then begin the exercise.
Reduce throttle to approximately 1500 RPM
As thrust decreases, more lift is required → pitch the nose up
Trim the aircraft while reducing speed
To compensate for lift loss, increase throttle to around 1900 RPM
Maintain direction using gentle rudder input and focus on a reference point
Without flaps, we can safely fly at approximately:
55 knots (101 km/h)
With flaps extended, we can safely fly at approximately:
43 knots (80 km/h)
I found it very difficult to hold the aircraft in the correct attitude:
Altitude decreased too much or
Airspeed increased too quickly
Maintaining heading is especially challenging, because at around 10° nose‑up attitude, outside visual references are limited. In this configuration, heading control relies almost entirely on inside instruments.
After about three attempts, I managed to perform the exercise correctly, but it was clear that repetition was needed.
During the second lesson (one week later), performance improved significantly:
The aircraft was lighter
Stall speed was slightly lower
Control felt more predictable
The slowest speed achieved during slow flight was 49 knots (90 km/h), which is very close to the onset of a stall.
During the Before Take‑off checklist and magneto check, call‑outs are mandatory:
Confirm values are within limits
Ensure the nose wheel is straight before braking
Reflection
This lesson made it clear that an overall change in learning and preparation is needed.
Going forward, I will:
First study the SOPs
Practice exercises in the flight simulator
Only then perform them in the real aircraft
This should improve safety, confidence, and consistency during future lessons.
End of the page 🎉
You have reached the end of the page. You can navigate through other blog posts as well, share this post on X, LinkedIn and Reddit or return to the blog posts collection page. Thank you for visiting this post.
This page contains all my notes for the 1.7 Stalls lesson. This was a very hard lesson because of the weather situations in late 2025. The lesson was cancelled for about 5 times, and 2 times we were already in the air but the weather was worse than forecasted. Then we did 3 lessons full of stalls till this was proficient enough to succcesfully restore them.
This page can contain a collection of personal notes, steps to remember, finished and unfinished content. Please excuse brevity.
Do not use specific information given like fuel flow, landing/take-off distances for your flights. Always refer to the POH of your exact plane for flight preparation. My information is just for references that I used.
Introduction
Lesson number
Lesson name
Lesson date(s)
1.7
Stalls
03-11-2025, 30-01-2026, 27-03-2026, 03-04-2026 and 17-04-2026
This page contains all my notes for the 1.7 Stalls lesson. This was a very hard lesson because of the weather situations in late 2025. The lesson was cancelled for about 5 times, and 2 times we were already in the air but the weather was worse than forecasted.
For the stalls lesson we needed the following weather parameters:
Flying on 3000ft to have enough altitude (potential energy) to recover from a stall.
As we are flying VFR, we need to be at least 1000ft under the cloud base
No significant weather
10km visibility
Wind at most 15 knots
This means I have done this lesson about 5 times, where only the last 3 were really valid as stalls lessons. I had to do two lessons because of the time shortage we had on the first valid lesson and the several attempts.
03-11-2025
Today we had the lesson scheduled in the afternoon. As the clock was going back from UTC+2 to UTC+1 due to daylight savings, we have dark at an earlier time than before. We also had around 14 knots of wind which was completely crosswind to the runway.
We started doing the Stalls briefing and theory of a stall. Then we continued checking the aircraft and doing the rest of the preparations. Then we took off, but quickly realized that the flight will be ended soon due to the weather and visibility, as we were not able to climb to 2500ft.
After around 25 minutes after taking off, we landed and scheduled a new flight.
30-01-2026
Today it was my first flight lesson in 3 months after around 4 cancellations. In the mean while, i’ve been very busy succeeding in the following items:
Radio Telephony rating
Navigation PPL theory exam
Communication PPL theory exam
The weather was our bottleneck, once again today. It was a cool and cold winter day with snow from earlier this week. This gave us beautiful winter sights from the plane. At around 2000ft (600 meters) after take-off we decided to not do the exercises today because of the cloud front coming to our way. This gave us a great and nice airliner-like view of flying above the coming cloud layer. We have descended and then headed back to our base for a butter landing by my instructor.
27-03-2026
Finally after some cancelled lessons and a vacation, we were finally able to do a lesson again. The weather was great with a layer of stratiform clouds at around 9700ft.
We reviewed the theory about stalls and the briefings done before executing the exercise. Then we prepared the flight reviewing the NOTAMs, aircraft and potential risks, and taxied to the fuel station where we filled up the aircraft.
We did the exercises and this went better as we proceeded doing more stalls. At first, I was too gentle at pulling back and also by recovering the stall. After around 4 times, I did this prociently according to the instructor. Some area’s where I can improve is getting the aircraft into a full stall, as this is very counter-intuative, pulling even more on the yoke when all alarms and bells go off.
We did these 2 exercises:
Stall recovery in clean (flapless) configuration
Stall recovery in approach configuration (20 degrees of flaps)
I learned that stalls can happen at anytime, when not having full focus or flying in circuits so a fast and adequate recovery action is needed to save yourself and passengers.
03-04-2026
Today we had the second full stalls lesson with somewhat less good weather than last week but still proficient to do our lesson. As we only did 2 of the 3 stall exercises, I needed to do another lesson which was good.
We had good weather, once again a little crosswind of around 8 knots and a cloud base on 7900ft of stratiform clouds. In all words, good weather for a nice flight.
We did 3 exercises this lesson:
Stall recovery in clean (flapless) configuration
Stall recovery in approach configuration (20 degrees of flaps)
Stall recovery in landing configuration (30 degrees of flaps)
Recovering stalls went a bit better than the lesson before, but I needed to remind some things that must be done better:
The stall can be recovered by only decreasing the angle of attack
Not directly push full throttle, which happens out of reaction
Steer with rudder, and not with ailerons
Better managability of the flaps, flaps go faster up than down in flight
Pushing the yoke is natual when recovering from stalls, so don’t be scared
Overal the lesson went great, the crosswind takeoff was the best so far, doing everything right from the taxi to the leave of the circuit, including crabbing take-off and holding altitude. Its a very strange feeling when taking off and having some crosswind, that your plane points into the wing, while having an other track as your heading.
The objectives for me to do at home for the next lesson are:
Review briefings of the taxi, take-off and exercise
Review exact RT
Overall, great lesson and looking forward to the next one.
17-04-2026
Today we did a reviewing and pre-circuit lesson, covering every aspect I have learned before in one lesson. This to completely prepare for the upcoming circuit lessons, where every aspect is very important as we are much closer to the ground.
Basic ascending and descending
Airwork, maintaining different altitudes and headings
Trimming the aircraft
Every stall exercise
Slow flight
I finally flown some of the circuit, all the way to late final where the controls were transferred to the instructor but there was a lot of progress after this lesson.
This is also the last lesson where we actively did the stalls, and now we are ready for the real work.
Stalls theory
We did some theory about stalls, what they are and how they happen and must be answered. We can have 2 stages of stalls:
Stall approach -> A stall is coming, some symphons are available
Full stall -> The actual stall where you will feel a result, like a wing dip, nose dip or airspeed loss
I will describe both of those further.
Stall Approach Recovery
In the Stall approach, we are close to a stall and are in the phase that the full stall can be avoided by taking action. In this situation, we can identify a stall approach by looking for these symthoms:
Stall warning beep (around 5kts before the actual stall)
Buffet, this means that the aircraft shakes a bit due to the disrupted airflow on the wings
Airspeed indicator, the end of the green arc, or white arc if flaps are deployed
When having these symtoms, immediately do the following actions:
Release yoke back pressure and some forward pressure to end the stall and unload the wings
Full throttle power
Disable the carb heat to have the highest engine RPM
Level the plane
Remember to never use the ailerons when recovering from stalls as this changes the angle of attack of the wings even further, increasing your stall and decreasing change of recovery.
Then we do some checks from bottom to up to the left to double check if we doing things right:
Fuel Selector (both unless instructed otherwise)
Mixture rich
Throttle
Carberateur heat
Ignition
Magnetos
Engine instruments (Oil temperature, pressure, cylinder head temperature (CHT) and/or exhaust gas temperature (EGT), ammeter and suction/vacuum)
And complete the exercise with some outside checks (APOS):
Altitude
Position
Orientation
Sky 180 scan for traffic/weather
Full stall recovery
In the full stall, we are stalling and one of these three things are happening:
Nose drop
Wing dip (always one of the 2)
Altitude loss
When having these symtoms, immediately do the following actions:
Release yoke back pressure and maybe some forward pressure to end the stall
Full throttle power
Disable the carb heat to have the highest engine RPM
Level the plane
Remember to never use the ailerons when recovering from stalls as this changes the angle of attack of the wings even further.
Then we do some checks from bottom to up to the left to double check if we doing things right:
Fuel Selector (both unless instructed otherwise)
Mixture rich
Throttle
Carberateur heat
Ignition
Magnetos
Engine instruments (Oil temperature, pressure, cylinder head temperature (CHT) and/or exhaust gas temperature (EGT), ammeter and suction/vacuum)
And complete the exercise with some outside checks (APOS):
Altitude
Position
Orientation
Sky 180 scan for traffic/weather
One thing to add, if doing stalls in landing configuration, we need to simultaneously decrease the flaps to also decrease the drag, which means more engine power resulting in more speed. You must at least decrease the flaps to 20 degrees to gain power. Full power on flaps 30 or 40 has so much drag that the engine almost cannot compensate for it.
Homework Altitude vs. Distance
Because of the bad weather in the winter weeks and no chance to do the stalls lesson, I was asked to do some homework. This consisted of these questions to get a better understanding of power, pitch, speed, flaps and range.
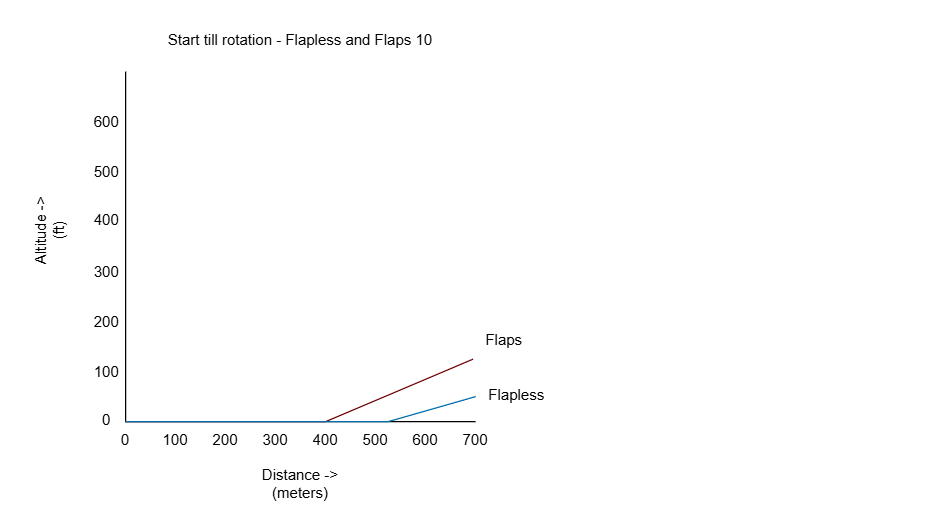
1. Flaps and Flapless at take-off
In the first question, I was asked to draw a graphic of what happens with the altitude and distance at the start of the take-off till rotation and somewhat after that.
In this graphic, I drew 2 lines, one for flaps 10 and one for flapless. As we have less lift without flaps, we will need a longer runway and therefore climbing later than with flaps extended. Both at a speed of around 65 kts.
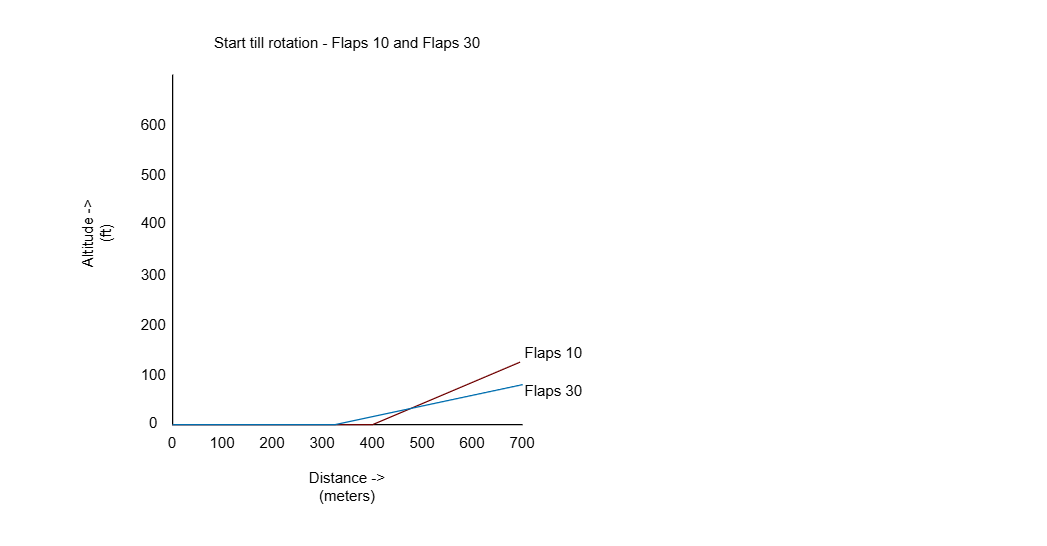
2. Flaps 10 and Flaps 30 at take-off
The second question was about answering what would perform better at take-off, flaps 10 or 30.
Flaps 10 is in terms the most efficient take-off flap setting, as this is a nice combination of lift and drag. Flaps 30 has an earlier lift-off point of the ground but at the cost of a low speed as result of the enormous drag it creates. We only use Flaps 30 in case of a short field take-off or needing to avoind objects at the end of a (short) runway.
3. Zero wind and 15 knots headwind
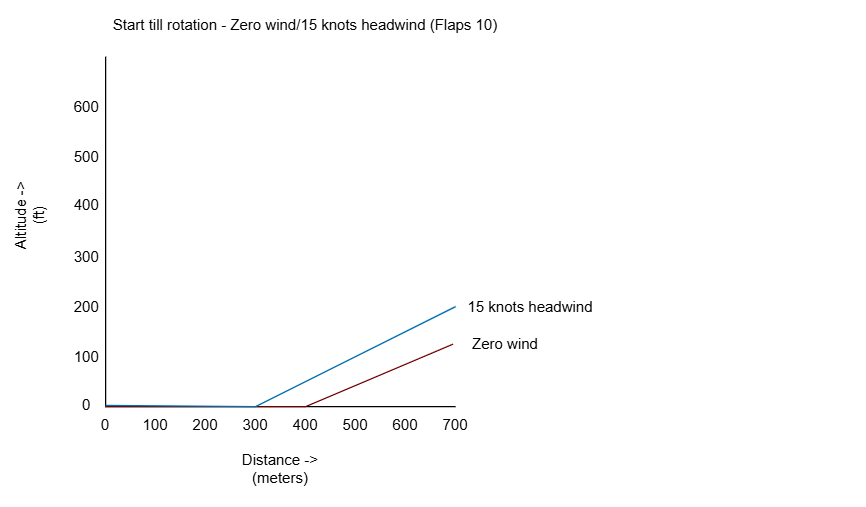
In the third question, I have to display the difference of a headwind. I chose an headwind of 15 knots, as this displays a nice difference and its a moderate wind speed for a better lift off.
As you can see, with 15 knots headwind, we will lift of earlier because of the extra 15 knots true airspeed. The horizontal flow of air is already 15 knots, so our plane could lift of at about 40-45 knots instead of the normal 55-60 knots.
4. 65 knots vs. 75 knots
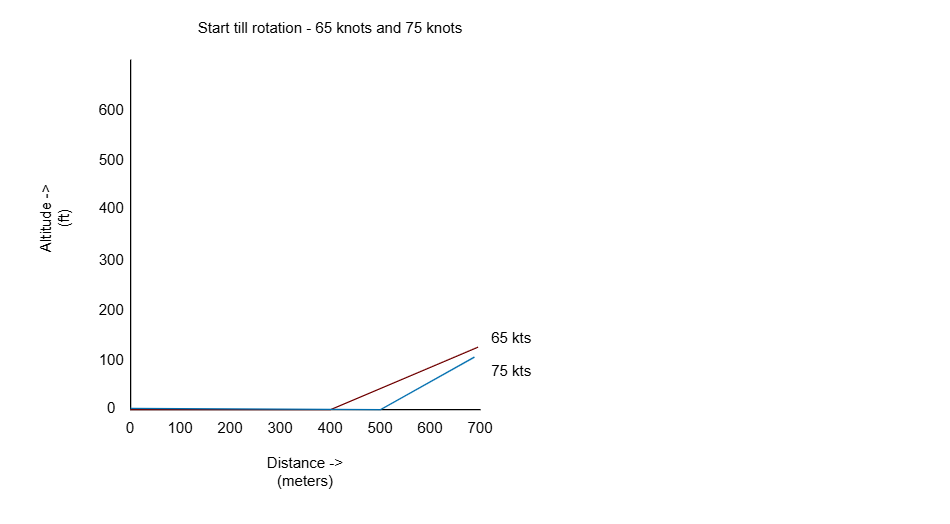
In the 4th question I was asked to draw the difference of 65 knots and 75 knots.
For the Cessna 172, these are exactly these values:
Vx: Best climb speed for short distance -> 65 knots
Vy: Best climb speed for short time -> 75 knots
So I drew this graphic where you see that to clear a certain distance, 65 knots is a better speed but when you take time, 75 knots is a better speed.
5. Descending with and without flaps
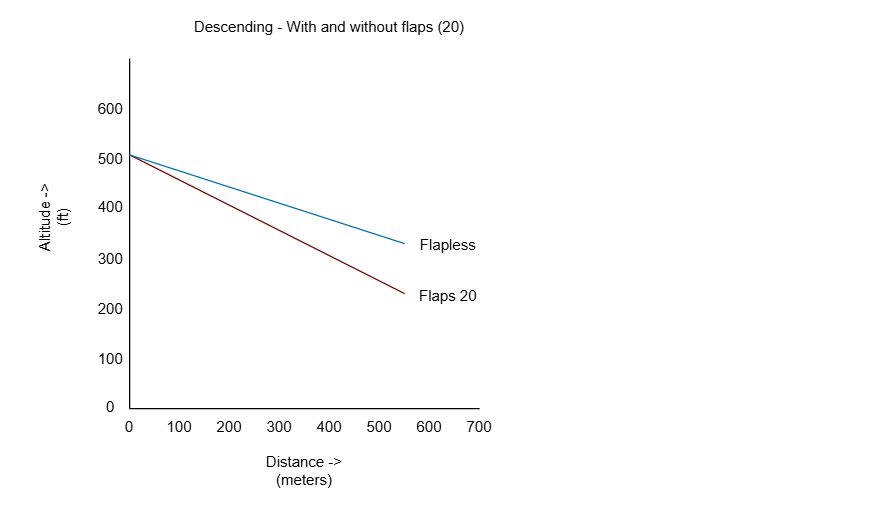
In the fifth question, we switch to the descending process. Here I was asked to draw the difference between descending with 1700 RPM and 95 knots with a speed of -500fpm vertical.
As Flaps increase or drag and lift and decreases our speed, we are able to descend faster in the same period of time.
6. Descending with and without headwind
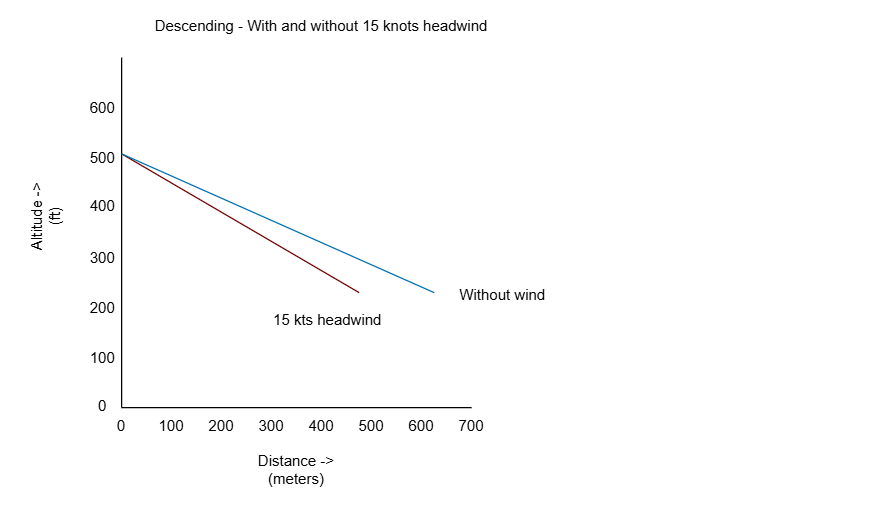
The 6th question was about the descending distance. Here we talk about horizontal distance we clear during descending.
As we want to descend, and we have 15 kts headwind, we are able to descend steeper. In the same time, we are descended further while flying less horizontal distance. This means a faster and steeper descent.
This is a result of the headwind decreasing our ground speed.
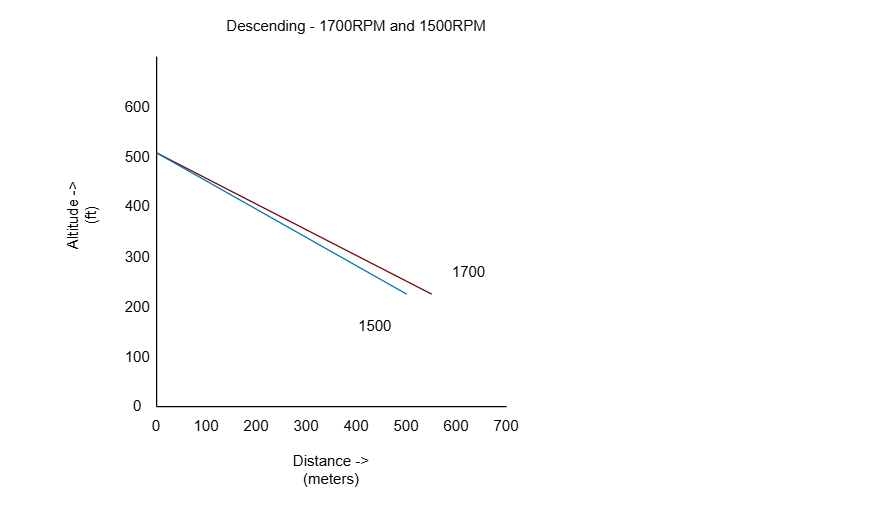
7. Descending - 1700RPM and 1500RPM
When descending with 1500RPM and 1700RPM, we have a little difference in terms of power. We have less forward trust, so somewhat more drag and a lower ground speed. This makes it possible to descend a bit faster relative to the ground distance.
8. Descending - Power Idle to touchdown
When descending with 3 different speeds, some strange will happen without knowing the theory behind it.
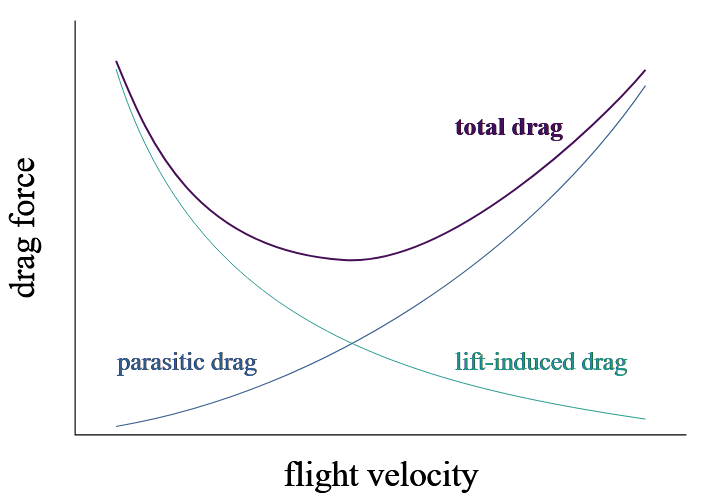
50 knots: You will descend steeply as you fly at the edge of a stall, this makes you descend fast relative to the ground and you have lots of parasite drag
65 knots: this is the best glide speed of the Cessna 172 and gives you the best distance to altitude ratio, and in this graphic so the furthest distance. You are perfectly in the middle of parasite drag and induced drag at this speed
75 knots: this is faster than best glide speed and makes you descend too fast, too much induced drag
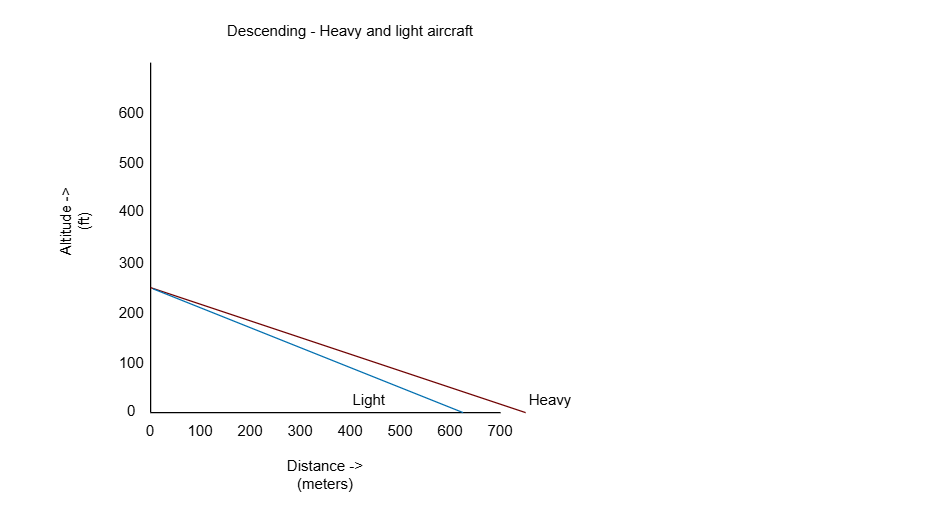
9. Descending - Best glide speed heavy and light aircraft
In a cessna 172, the default best glide speed is around 65 knots. However, if we increase the weight of the aircraft, we have to also increase the lift to compensate for the extra weight. To create this more lift we need a little more speed. Heavier aircraft means you need a higher best-glide speed.
However, a higher speed relative to the ground means that we need more horizontal distance than flying in a light aircraft, so you need to descend earlier.
10. Final to touchdown and roll-out - Flapless, 10 and 30
Descending with flaps, especially to touchdown is much easier, as the more degrees of flaps we have, the less ground speed and so more time to point the plane correctly at the runway. If we have a flapless configuration, we need to maintain a very slow speed resulting in a very high pitch attitude. FLaps help us descending more easily and to see the runway much better.
This is the reason we will be completely finished earlier on the runway, braking away our kinetic energy.
11. Final to touchdown and roll-out - Zero and 10 knots headwind
Headwind also decreases our groundspeed, having less speed relative to the ground. This gives us more time to point the plane at the runway and we need to lose less kinetic energy. With headwind, we will be standing still somewhat earlier.
End of the page 🎉
You have reached the end of the page. You can navigate through other blog posts as well, share this post on X, LinkedIn and Reddit or return to the blog posts collection page. Thank you for visiting this post.
Today was the day that we do circuit training for the first time. An hour before this flight lesson, I passed the meteorology theory exam which I’m very happy about, after some doubts the night before. Now I need to do just 2 more exams (AGK and POF) to be done with the theory.
This page can contain a collection of personal notes, steps to remember, finished and unfinished content. Please excuse brevity.
Do not use specific information given like fuel flow, landing/take-off distances for your flights. Always refer to the POH of your exact plane for flight preparation. My information is just for references that I used.
Introduction
Lesson number
Lesson name
Lesson date(s)
1.8
Circuit 1
20-04-2026
Today was the day that we do circuit training for the first time. An hour before this flight lesson, I passed the meteorology theory exam which I’m very happy about, after some doubts the night before. Now I need to do just 2 more exams (AGK and POF) to be done with the theory.
Before looking further into the required steps and procedures, I will first review how an aerodrome circuit looks like. Every part of it has an name, which makes it easy to communicate with ATC and other traffic about where you are around the aerodrome. Saying phrases like “North of the runway” or “Approaching runway” are very vague phrases which we avoid.
Aerodrome circuit explained
A circuit around an aerodrome is divided in several legs, where we will always take-off and land into the wind. That is where the names come from:
Leg name
Description
Upwind
The leg you fly when taking off
Crosswind
The leg after the first turn where you actually having crosswind
Downwind
The leg completely opposing the runway, where you gain ground speed due to tailwind
Base
The leg before final, where
Final
The final leg into touchdown/landing
Here is the full diagram of all legs including recommended flaps settings and engine RPMs with a Cessna 172:
The rest of this page, I will use these phrases.
Runway memory items
The runway memory items is this short checklist you must know right before lining up and take-off. Lining up means crossing the yellow separator from taxiway to runway.
Carb heat - Off
Transponder - ALT
Flaps 10
Strobe, and Landing lights - On
Taxi lights - Off
Pitot heat when in air under 10 degrees
Check magnetic heading
Circuit flying rules
In the circuit, some rules apply to flying the circuit to make it safe for yourself, other traffic and people on the ground.
Minimum altitude for turning is 300ft HAA (Height above aerodrome), normal turning altitude is 500ft HAA
Do not perform the after take-off checklist in the circuit
On crosswind leg, pay attention for possible new traffic joining the circuit at mid-downwind. This is the traffic entry point
Descend power is 1500RPM
Turn to final with at least 70 kts IAS and max 20 degrees bank to avoid a stall, preferably fly every turn at 20 degrees max: when not climbing
You should have 350ft HAA after completing the turn to final
Landing flaps must be extended at 150ft HAA
RT calls in the circuit
At some points, the tower and other traffic expect you do do various radio calls in the circuit. This is an extra reminder to other traffic to announce your position and traffic separation.
Lining up runway (initial take-off)
Beginning downwind
Mid downwind -> landing intention (Full stop/Touch and go)
On base (not required)
On final
Possible go-around
When leaving the circuit
Leaving circuit area
The lesson itself
The lesson itself went great. The weather was okay but not great. We had a slight crosswind coming from the north at around 7-8 knots. This was completely opposing the runway at a 90 degrees angle. It was around 12 degrees and a sky filled with cumulus clouds with a layer of altostratus above. A typical occlusion-front weather type.
After doing the pre-flight inspection on my own we taxied to the runway and took off. We exited the circuit to re-enter it again, just to practice this. Then we did 6 circuits and landings with flaps and a last circuit without flaps.
The most important sentence of this lesson is: “Pitch for speed, power for altitude”. This means:
Increase power to gain altitude, decrease power to lose altitude
Increase pitch angle to lose speed, decrease pitch angle to gain speed
As we had a crosswind, we needed to do some other actions too. We had to crab the airplane into the wind to maintain the track to the runway and we need to land on the wind-facing wheel first. This prevents us from overrunning the runway by the wind.
The lesson went great and after some touch-and-go’s I think taking off went a lot smoother.
Remarks
The set of real reminders which I need to remember for future lessons are the following:
Starting the pre-flight inspection, check magneto’s set to OFF -> this prevents a hot prop
Carb heat must be set on downwind leg and kept on till after landing and completing the after landing checklist
Keep the plane into the wind with Ailerons
Review and practice the briefings for take-off and approach
End of the page 🎉
You have reached the end of the page. You can navigate through other blog posts as well, share this post on X, LinkedIn and Reddit or return to the blog posts collection page. Thank you for visiting this post.
This page can contain a collection of personal notes, steps to remember, finished and unfinished content. Please excuse brevity.
Do not use specific information given like fuel flow, landing/take-off distances for your flights. Always refer to the POH of your exact plane for flight preparation. My information is just for references that I used.
Introduction
Lesson number
Lesson name
Lesson date(s)
1.9
Circuit 2
23-04-2026
Today we had a beautiful weather day with a small layer of stratus clouds dissolving as the sun rose and with a slight crosswind component. At the time of take-off, they almost all dissolved giving us a clear sky with sun. The wind was around 6 knots, coming in a 60 degree angle of the runway, which is not that strong and good for some circuit training. Because we did some basic circuits the previous lesson, we will going to make it a bit harder now with some more factors into play.
In this lesson we also did the following extra exercises:
The circuit went good, with some remarks of course, as this is the second lesson. We added the downwind checks where we check the following (iHARSi):
Incoming traffic
Altitude
Distance to runway
Heading
Speed
Incoming traffic again
On downwind, we do a little rounding checkup of every important component of the plane where we have to determine if we are going to get the runway.
Fuel selector: Both
Flaps -> to 10 degrees
Mixture: Rich
Throttle
Carb heat -> set to on (pull)
This went better as we progressed into more circuits. However, still a lot room for improvement. Everything is clear but when all components come into play at the same time when flying a plane is a bit hard.
Rejected take-off
A part of this lesson was performing a rejected take-off. This is a procedure where we determine, during the ground-roll for taking off, that it’s unsafe to fly. This can have multiple causes, like:
Birds on the runway
Engine RPM unstable or too low
Incoming unforeseen aircraft
Other causes which renders the plane not safe to fly
When performing this, we close the throttle and keep the nose wheel somewhat lifted to defend it from shimmnying. We will only brake to get the right taxiway or when we do not have enough runway left.
Short field take-off
At a short field take-off, we consider the runway length very worthy and limit the amount needed to clear an object at 50 feet after the runway. In this procedure, we will line up on the runway by limiting the amount at the start. We keep holding the brakes there till the engine hits full RPM. Then we release the brakes and off we go. We will catch up the unwanted movements of the plane with the rudder pedals while keeping our heels on the ground.
When we have crosswind, we steer into the wind and gradually release that steering as we tend to hit rotation speed.
Soft field take-off
We also performed a soft field take-off, where we consider the runway to be soft and has a great risk of being stuck in mud or grass. We do a rolling take-off here, where we keep rolling and going into the take-off roll. Stopping might get us stuck in the grass, making the situation very dangerous.
We also keep some back pressure on the yoke to release pressure of the nose wheel.
Go around
A go around is performed if an aircraft is not safe to land or the runway is already in use. During the go around we push full power and then release the flaps to 20 degrees. This gives us more engine power as the drag reduces a lot. If there are other activities at the aerodrome like towing, gliders and parachutes, we keep the opposing side of the runway for those activities.
We also did this exercise today and went all right. However I need to remember keeping the plane straight and not dipping because of the lift-loss.
Wave off
A wave off is when we are busy landing but we are not 100% stable just above the runway. During this exercise my instructor pressed the rudder pedals softly on purpose, and we had to give full engine power to make another approach.
Waving off is better than a bouncy landing which can be dangerous.
Glide-in approach
We did also an glide-in approach. This is where we only use the pitch angle to glide to the runway. On the Base leg, we closed the throttle and glided from 1000ft to the runway. Being on 1000ft gives us a lot of potential energy to make it to the runway. This was a very fun exercise to do.
Flapless landing
We ended this lesson with a flapless landing once again. Here we do not use flaps, making the approach angle much flatter. This however comes together with higher speeds (+5 kts on every leg) and a longer landing roll.
Remarks
Climb attitude after take-off -> be sure to keep 65 knots when climbing from the runway and then 75 knots after retracting the flaps
Climbing turns with maximum of 15 degrees
More exercise on doing multiple things together -> downwind/base
Battling the effect of flaps: more flaps means more climb and less flaps is less climb. Be more pro-active when setting these by reacting faster on those effects
Again review my briefings
Right now my total amount of flight hours is 12 hours and 45 minutes (12:45) which is more than proficient for the lessons I have done.
The next lesson
The next lesson we will perform a diversion to another airfield, as where I have to prepare for that reviewing the charts and the procedures. This is my homework.
I will also perform this into my simulator in the days towards this next lesson.
End of the page 🎉
You have reached the end of the page. You can navigate through other blog posts as well, share this post on X, LinkedIn and Reddit or return to the blog posts collection page. Thank you for visiting this post.
In lesson 3 of the circuit training, we reviewed the circuit part and did a training diversion to an airfield in Germany, to experience a diversion but also a navigation flight. This page also contains the additional circuit lessons I took to fully master normal and crosswind landings.
This page can contain a collection of personal notes, steps to remember, finished and unfinished content. Please excuse brevity.
Do not use specific information given like fuel flow, landing/take-off distances for your flights. Always refer to the POH of your exact plane for flight preparation. My information is just for references that I used.
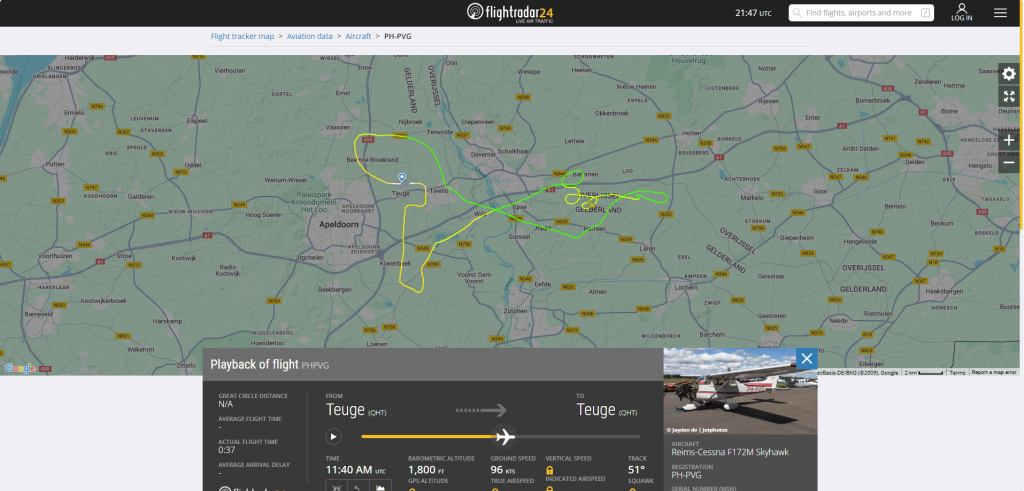
07-05-2026 (Diversion)
Lesson number
Lesson name
Lesson date(s)
1.10
Circuit 3 with diversion
07-05-2026, 09-06-2026, 22-06-2026 & 16-08-2026
Today we did a circuit training lesson with a diversion to an airfield in Germany. The purpose of this lesson was a little preparation for the upcoming solo lessons. Then I have to find a possible diversion for myself, as an airfield can be closed temporarily for several reasons. We don’t want to still be in the air while having too less fuel and such.
It was a great day for flying with some sun, 5 knots crosswind and an air filled with stratocumulus and alto-cumulus clouds and the temperature was around 14 degrees.
We took off from our default airfield with a short briefing of the route. Then we went to the fuel station to have at least 24 gallon on board, giving us 3 hours of flight time which is plenty. According to the lesson program, we needed to do circuits but we only did the diversion today. We aim for another 2-3 circuit lessons to fully control that.
After taking off we signed on to Dutch Mil info for the first time, this is something which is not needed in training flights but we did it to get an basic understanding of how this is done. Dutch Mil Info is the Flight Information Service (FIS) for most of the Netherlands, giving traffic and weather information to General Aviation pilots. Its not a control center, so we pilots still have to maintain our own separation but Dutch Mil can give us possible information in special cases.
We navigated to the other airfield using basic chart-navigation. We plotted 3 lines between obvious visual reference points like cities, powerlines and trainroads and calculated a basic course-plan. We followed those points and after a short flight we landed safely on the airfield. Then after a short break we headed back to our main airfield and debriefed the lesson.
Remarks
Some remarks from this lesson for myself are:
Take higher circuits into account, we were a little high on final making the landing distance also very long
Keep the altitude better under control using visual flight -> pitch attitude
All with all it was a good lesson with two decent landings and looking forward to the next one, which details will come online soon.
09-06-2026
Today we had a great circuit training flight of exactly one hour. The weather was okay with around 9 knots of slight crosswind but almost full headwind which is nice for lessons like this.
We did 8 take-offs and landings which in the beginning I had to first get a little used to the controls again after a short break of around 30 days of flying and at landing 3 it went a lot better. Landing 7 and 8 went completely by myself where number 7 went a little bit bouncy but number 8 was really smooth.
In the briefing for this lesson I learned more about the attitude of the planes’ nose during the flare, this must almost hit the horizon for the pilot’s point of view. We need to shift the focus point to the end of the runway as you point the nose towards there. This is something which sounds simple but takes a lot of practice to master.
Remarks
Some remarks of this lesson where:
Steer somewhat smoother and not do great actions, especially on final and flaring
Remember the downwind checks after the initial position, altitude and incoming traffic checks
Seats and belts
Fuel selector
Mixture
Engine instruments
Carb heat -> on
Flaps
Overall it was a good flight lesson and I think I made some decent progress.
22-06-2026
Today, once again a circuit training lesson. We flown about 1 hour and 15 minutes and did 10 take-offs and landings. The weather was very great, only downside was the relatively high temperatures. About 26 degrees celcius at 11 o’ clock. The sky itself was almost clear, only some high level cirrus clouds so nothing to worry about on that part. We had a little crosswind of 7 knots.
I have also reviewed the briefings and RT another time and learned them completely. This was the first lesson I did them correctly on my own, so thats a win.
The first 3 landings went a bit rough where the instructor had to correct some but it went gradually better. Did not fly for about 2 weeks so we have to adapt a little. I also had a little harder time centering the plane on to the runway because of the crosswind.
Then I had about 4 landings with minor corrections needed by the instructor and we also did a go-around to simulate a failed approach or landing. Its still a human task of course.
At about 2 landings, the altitude for the flare was correctly done by myself but then the flare itself was too weak, causing the plane to hit the runway a little hard. But hey, any landing where you can walk away from is a good landing.
Remarks
The room for improvement/remarks of this lesson are:
Get the flare altitude right
The coorperation of yoke/rudder input when having crosswind landings (slipping)
RT lines
Downwind checks were okay but also keep incoming traffic in mind, make bigger turns when traffic in front and/or slow flight
28-06-2026
Today a lesson on Sunday for the first time as the weather was pretty good. It was a bit warm, like 27 degrees celcius, giving us worse climb performance but did not stop us for once again a circuit lesson.
The lesson went progressively better as the last 2 or 3 landings were very good. I learned that at the flare/touchdown looking at the end of the runway and pointing the nose to the end of the runway is a great technique to make soft landings without bouncing too hard on the tarmac. Also the RT simultaneously went better and almost smooth on the end.
Remarks
Of course there were some remarks which I have to improve:
Keep an eye on the field
Apply slow flight when busy traffic in the circuit
Keep looking at the end of the runway during the flare
The instructor said that he saw some good progress in these last two lessons which is nice.
16-08-2026
Today we went back to a circuit lesson only to prepare for the first solo flight. We had some quite worse weather than the lessons before, with some light rains just before the lesson. The sky was fully filled with stratocumulus and nimbostratus clouds but with some dry periods over the day. The wind was about 7 knots and around 20-30 degrees of the runway so that was really great for some circuit training.
We first left the circuit and gone back in to train this as well. Then we did 8 landings in total, where 5 of them where great according to my instructor. 2 were not corrected in time and one we had to perform a wave-off, which is basically a late go-around. This happened because we needed to correct with our rudder too much and caused some bouncing action.
The last 3 landings in a row went very great where the flare was executed much better and we let the aircraft do the descent itself by flaring, power idle and keeping the nose just below the horizon.
Remarks
The remarks and homework of this lesson are:
Keep the speeds good ay all phases of the circuit:
55 knots: Rotate
65 knots: Climb out of ground effect
75 knots: Climb out from 200ft to 700ft
Keep 75 knots till 700 feet is reached
Downwind: 80-85 knots
Base: 75 knots
Final 65 knots all the way till the runway threshold
The flare-height was good according to my iinstructor, so we need to keep this
Minor rudder inputs on final
Remember all checks, start on beginning downwind and perform check run 1 for incoming traffic and position, then perform downwind checks
All with all a great lesson with great improvement since all the previous circuit lessons.
End of the page 🎉
You have reached the end of the page. You can navigate through other blog posts as well, share this post on X, LinkedIn and Reddit or return to the blog posts collection page. Thank you for visiting this post.
Today we did the progress test for phase 1. This is a flight where we will perform every exercise learned in Phase 1. To enhance this lesson, I got another instructor which can also help me improve on different area’s.
This page can contain a collection of personal notes, steps to remember, finished and unfinished content. Please excuse brevity.
Do not use specific information given like fuel flow, landing/take-off distances for your flights. Always refer to the POH of your exact plane for flight preparation. My information is just for references that I used.
Introduction
Lesson number
Lesson name
Lesson date(s)
1.11
Progress test 1
20-07-2026 & 04-08-2026
Today we did the progress test for phase 1. This is a flight where we will perform every exercise learned in Phase 1. To enhance this lesson, I got another instructor which can also help me improve on different area’s.
Progress test 1 (20-07-2026)
Another lesson today after again one cancelled lesson because of the weather. Flying with 34 degrees celcius was not what we wanted. Haha.
Today we had around 20 degrees celcius, with a 8 knots wind from the north (variable between 280 and 040) and a sky full of cumulus clouds, starting at 2800 feet AGL. A great day for some VFR flying with no significant weather or other risks.
So today we will do the progress test for phase one. A lesson of one hour to perform every exercise done in phase one:
Steep turns with 45 degrees bank angle
Stalls in clean, approach and landing configuration
Climbing and descending turns
Two circuits
Landing the plane with some crosswind (~8 knots)
Homework
I got some homework for the next lesson, which will also be a progress test but then a final test for both the exercises above and the circuits.
Progress test 1 (04-08-2026)
Today we had another progress test 1 lesson to actually put the cherry onto the pie like we say in Dutch. It was a very warm day today with a stunning 34 degrees celcius. The sky was very blue with some cirrus and cirrostratus clouds, but as they are very high level clouds no reason to not fly.
Because of this temperature, we have to add up 2400ft to our density altitude. At sea level, this is not a problem but this can be a problem if flying from a high-elevation field like Courchevel in France.
This weather gives us worse climbing performance because of the less amount of air particles and a longer take-off run needed, but when flying, our TAS and ground speed will be higher because there is less air to fight with (less dense, warm air expands).
We did the following excercises during this flight:
Steep turns with 45 degrees bank angle
Stalls in clean, approach and landing configuration and also a descending turn stall in approach configuration to simulate the turn from base to final
Climbing and descending turns
Trimming and staying level
Four circuits
Landing the plane with some crosswind (~5 knots)
The final two landings went good but because of the crosswind somewhat traversing. All with all a great lesson with some progress and I now have passed the 20 flight hour mark and 65 landings which is a great setup for phase 2.
Remarks
As always, I have some remarks for the next lessons and flights:
More flying on visuals and nose attitudes
Better coorperation between rudder and ailerons during landings, especially in crosswind
End of the page 🎉
You have reached the end of the page. You can navigate through other blog posts as well, share this post on X, LinkedIn and Reddit or return to the blog posts collection page. Thank you for visiting this post.
This category contains the details of my flight lessons in Phase 2, where you learn to fly good.
2.1 First Solo
In this lesson I performed my first solo flight ever and did some circuits as perparation. A great summary of this lesson is the day of becoming a pilot instead of a student.
This page can contain a collection of personal notes, steps to remember, finished and unfinished content. Please excuse brevity.
Do not use specific information given like fuel flow, landing/take-off distances for your flights. Always refer to the POH of your exact plane for flight preparation. My information is just for references that I used.
Introduction
Lesson number
Lesson name
Lesson date(s)
2.1
First solo
10-09-2026
Today was finally the day that my first solo flight took place on the Cessna 172 which is a very great experience after around 24 hours of being with a instructor at all times, you are the only one in control of the flight left.
The weather was great flying weather, with around 4 knots of wind and a beautiful blue sky filled with some cumulus clouds here and there but nothing to worry about. The temperature was around 18 degrees celcuis and the pressure around 1020 hPa.
We first did some circuits to warm up, shape things up and getting a feel for how a solo flight will go today. After that we did the actual solo flight.
Medical Class 2
Before this lesson, I did my medical examination to gain the EASA medical class 2 certificate which is required to be in an airplane on your own. This was an overview of checking ears, eyes heart, helthyness, blood pressure and such. I succeeded good, so no problems there.
The circuits
Before I was sent off to perform my first solo circuit, we did around 5 circuits with a landing as final action. The circuits went okay with some remarks about the checks and actions which I will later dive into.
The landings were really good and I finally got myself at landing the plane good for at least 4 times in a row. The first landing was okay but with some traversing motion, but was a warm up for me after around 2,5 weeks of no flying. The round-out and flair altitude were really good and the touchdowns also. Every landing is different, which may sound stupid but you get to experience this while doing, this is really true.
After 5 circuits my flight instructor wanted to call it a day and the suprised me with “Hey, great luck man I’m out of here.” Haha.
The solo circuit
So the 6th circuit I had to perform was the solo circuit. I went from the taxiway back to the beginning of the runway, then took of to turn a circuit around the aerodrome and then land again.
When becoming a pilot, flying solo and having a feeling of accountability is very important and you gain this in the lesson program. When learning to drive a car, you will drive solo after getting the exam which is really different from flying.
Cool. So I lined up on the runway, took off and made 4 left turns to land the aircraft back on the same runway. The circuit itself went okay, with some remarks which I will describe separately and made an error in the radio call on downwind but nothing to worry about. The tower/ATC knew I did my first solo so they do expect not a perfect pilot and were really humble. They applauded for the landing and made a joke that my instructor never made such a good landing. Great people, haha.
After landing and parking the plane, I was awarded some applause and congratulations and awarded a water douche just as every other pilot over the world to celebrate the first solo flight.
Remarks Circuits
The remarks of the circuits with instructor are:
Remind the propellor slipstream, especially on final. When on high power, the nose goes to the left
Descending turns must be done with some forward pressure on the yoke. The upgoing wing will produce some lift and can cause a climb of the plane
So don’t climb in turns
Keep the approach speed on at least 65 knots, better some knots more than too less as this gives you more energy for the round out and flare
Try to keep back pressure longer during the flare to touch down at a lower vertical speed
During final till touchdown, keep feet straight on pedals to have good control over the direction and brakes. During touching and go, switch to heels on the ground to not make accidental brake inputs
Remarks Solo
As the first solo flight is a bit thrilling, this is a good cause of some minor errors so I will not point out everything I did wrong but will mention some room for improvement.
Think of the radio calls you make and make them sound right, I told ATC to make a touch and go instead of a full stop as we did around 40 touch and go’s at this moment, little bit of memory based
At rotation, let the plane gain some speed and keep 65 knots for the rest of the climb till 200 feet. From there you can switch to 75 with flaps up
What I did good on my solo flight:
Correcting the nose attitude during touch down, was a little too fast but corrected it with just the right amount of back pressure to make it buttery
Speeds, RPM, pitch and flap settings
The checks and restore actions
A great summary of this flight is is: great aviation and navigation, moderate communication.
End of the page 🎉
You have reached the end of the page. You can navigate through other blog posts as well, share this post on X, LinkedIn and Reddit or return to the blog posts collection page. Thank you for visiting this post.
This page can contain a collection of personal notes, steps to remember, finished and unfinished content. Please excuse brevity.
Do not use specific information given like fuel flow, landing/take-off distances for your flights. Always refer to the POH of your exact plane for flight preparation. My information is just for references that I used.
Introduction
Lesson number
Lesson name
Lesson date(s)
2.2
Forced landing 1
24-08-2026
Today we did the Forced Landing 1 lesson and exercises. The main objective is to have a landing plan and field within reach at any given moment as an engine can be failing unexpectedly. Training this procedure can save lives, not only of pilots but also from the passengers and even for people on the ground.
The weather was perfect today, with 3 knots of wind which is very calm. We also had almost zero clouds and minor to zero thermal/turbulence.
We skipped the first solo lesson for now, because I found the forced landing exercise important to have done prior to be alone in a plane and I still had to perform the medical assessment for the class 2 certificate which I will do after this lesson.
The Forced Landing exercise
The Forced Landing exercise is something flight instructors will do and then sometimes randomly cut the throttle to let the student pick a field and demonstrate how they would land there. Some basic information we must know:
Wind direction
Best glide speed is speed of minimal drag means highest gliding distance (somewhat slower decreases distance but increases time)
So basically from the beginning of the engine failure we have those 5 steps, where best glide speed and simultaneously looking for a field are the two most important steps.
Pitch for 65 knots (vGlide) and trim ~5 times for nose up which is down
Check for possible causes in the cockpit
If engine doesntt start, you are commited to landing and should have a landing point by now
On the end of downwind set Flaps 10 and keep field in reach
Turn to base/final and set Flaps 30 for a steep descent and land the plane
Evacuate (if not simulated)
So suitable fields are fields that are somewhere about between light-green to yellow.
Dark green mostly means thick grown crops or sweetcorn for example
Earth-colored mostly means sand and wet earth
We did this exercise about 4 times, and the first time was more like a demonstration. Then I had the controls and it went allright with some room for improvement to get a better descent path but the plane could be landed at all attempts if done better. We will contintue exercising this in the following lessons till it will be done good to perfect, as this is one of the most important lessons.
After the forced landing exercises we also did 3 circuits where 2 of the landings went very great with a clapping instructor during the second landing, where you know you are on a great pace :)
Remarks
Altough I got an applause, this doesnt mean that everything went perfect of course. The remarks of this lesson are:
Better remember the memory items of the Forced Landings and better preparation on the forehand
Speed on final must be kept at 65 knots at all times all the way till the runway threshold
Better steering with the rudder during the round-out and flare
The centerline is not a holy grail which must be hit at all times, some feet of is no problem. Safe landings is number 1 priority so do not correct for this
End of the page 🎉
You have reached the end of the page. You can navigate through other blog posts as well, share this post on X, LinkedIn and Reddit or return to the blog posts collection page. Thank you for visiting this post.
In this second solo lesson, I left the circuit/airport area to fully fly standalone. Then I performed some simple exercises and re-joined the circuit to land safely.
This page can contain a collection of personal notes, steps to remember, finished and unfinished content. Please excuse brevity.
Do not use specific information given like fuel flow, landing/take-off distances for your flights. Always refer to the POH of your exact plane for flight preparation. My information is just for references that I used.
Flight lesson 2.3 - Solo 2
Lesson number
Lesson name
Lesson date(s)
2.3
Solo 2
28-09-2026
The flight lesson 2.3 with name Solo 2 focusses on basic flight procedures being alone in the cockpit. In phase 1 I learned how to fly, take-off and land the plane with some turns, stalls and recovery procedures baked in. In the first solo we break the seal of flying solo for the first time, without any form of help in the cockpit. The second solo flight is somewhat more complex and wants you to:
Take-off
Leave the circuit
Perform some 30 degrees and 45 degrees (steep) turns
Rejoin the circuit
Perform 1 or 2 touch and go’s
Make a full stop landing
This is really a very basic flight where most aspects will come into play, as well as every memory item, procedure and radio call must be performed. A great way to step up the game in solo flight.
The weather during this lesson
The weather during this lesson was great. We had a sky filled with some high level stratus clouds with some cumulus clouds under it. We got some half sunlight because of the layer of (also)stratus. The wind was somewhat variable but stable on our runway. No big crosswind challenges here.
Few clouds, of maximum 2/8 coverage on 7400 feet AGL
BKN190
Broken clouds, of maximum 7/8 coverage on 19000 feet AGL
22/15
Temperature 22 degrees celcuis, dewpoint 15 degrees, relative humidity 68%
Q1020
Air pressure calculated back to sealevel: 1020 hPa
=
End of METAR
First the lesson with instructor
As we are going solo with relative little experience and after a week of not flying, we will first do the lesson with instructor. Then he gets out and wishes me luck to repeat everything on my own.
With instructor, everything went okay. Some little remarks here and there like climbing in turns, speed too little and too less or much bank angle. No big deals. Then we did 2 circuits where I pulled off my best landing so far. We almost did not feel any touchdown and this is where I want to be at all landings. The landing after that, we had to make big turns because of other traffic, slow flying into downwind and base and resulting in us too high and a somewhat unstable landing. Could have been a go around.
Then my instructor got out and wished me luck to repeat everything.
Flying the Solo 2 lesson
I went back to the holding point of the runway and took off with no remarks. This went perfect and it amazes me again how much the plane wants to climb with the less weight without instructor. I climbed out of the circuit and left the circuit. Then I did the after take-off checklist on my own which is a strange experience, after doing this about 20-25 times with instructor.
I flew to a nearby village at 10 kilometers away to perform the steep turns. I decided to perform two turns, one over left and one over right.
To review the steep turn exercise a bit, we bank just like any other turn but at 30 degrees we add around 200-300 RPM and hold the plane on a specific altitude. In my case 1.500 feet. Both turns went great in my opinion, with the turn over the left I climbed around 50 feet in altitude. I corrected this in the right turn.
Then I went back to the circuit, and some traffic was already in the pattern. Therefore I left the circuit as my instructor has done also one or two times and rejoined with a big and sweeping curve.
In the circuit, everything went allright but my landings were a little bit too hard on touchdown. Both of them. I need to get the correct flare height and amount of yoke input somewhat better. My instructor saw the landings from half a mile and marked them as OK, but not perfect but I found them worse.
Remarks
Of course, Im a little bit of a perfectionist so every lesson has some remarks:
Getting the right flare height and amount of input
No altitude changes in turns, keep the plane on the desired altitude
End of the page 🎉
You have reached the end of the page. You can navigate through other blog posts as well, share this post on X, LinkedIn and Reddit or return to the blog posts collection page. Thank you for visiting this post.
This page can contain a collection of personal notes, steps to remember, finished and unfinished content. Please excuse brevity.
Do not use specific information given like fuel flow, landing/take-off distances for your flights. Always refer to the POH of your exact plane for flight preparation. My information is just for references that I used.
Flight lesson 2.4 - UPRT 1
Lesson number
Lesson name
Lesson date(s)
2.4
UPRT 1
06-10-2026
The flight lesson 2.4 with name UPRT 1 is an advanced flight lesson where we learn some Upset Prevention and Recovery Training (UPRT). This means we will be trained to recognize the plane getting in a spin or spiral dive and be able to recover successfully. Getting in those situations can happen, and be better prepared and know what to do than facing this and completely lose control.
2.5 Solo 3
In this third solo lesson, I left the circuit/airport area to again fully fly standalone. Then I performed some simple exercises and re-joined the circuit to land.
This page can contain a collection of personal notes, steps to remember, finished and unfinished content. Please excuse brevity.
Do not use specific information given like fuel flow, landing/take-off distances for your flights. Always refer to the POH of your exact plane for flight preparation. My information is just for references that I used.
Flight lesson 2.5 - Solo 3
Lesson number
Lesson name
Lesson date(s)
2.5
Solo 3
28-09-2026
The flight lesson 2.5 with name Solo 3 focusses again on basic flight procedures being alone in the cockpit. I already did one circuit solo in my first solo flight and did the steep turns solo and headed back. This lesson focusses more on airmanship and
Take-off
Leave the circuit
Climbing turn (15 degrees)
Descending turns (30 degrees)
Rejoin the circuit
Make a full stop landing (or touch and go if possible)
This is again really a very basic flight where most aspects will come into play, as well as every memory item, procedure and radio call must be performed. A great way to further step up the game in solo flight, as we have to make 10 hours of solo before getting a PPL license.
The weather during this lesson
The weather during this lesson was Okay, but somewhat deteriorating. We had a sky filled with some cumulus clouds with a layer of stratus above it, causing some light drizzle. The wind was somewhat variable but cross to our runway. No big crosswind challenges here, but something to take into account.
Few clouds, of maximum 2/8 coverage on 4100 feet AGL
SCT069
Scattered clouds, of maximum 4/8 coverage on 6900 feet AGL
BKN075
Broken clouds, of maximum 7/8 coverage on 7500 feet AGL
22/15
Temperature 22 degrees celcuis, dewpoint 15 degrees, relative humidity 68%
Q1020
Air pressure calculated back to sealevel: 1020 hPa
=
End of METAR
Flying the Solo 3 lesson
As the Solo 3 lesson was right after the Solo 2 lesson, the flight instructor told me the plane was free for 1,5 hours and the weather was okay. As I already drove to the aerodrome, it could be great to add another solo flight to this afternoon. I agreed and reminded the last winter where I got a spree of 5 lessons being cancelled.
So I stepped back in the same plane where I was 15 minutes ago. I proceeded to the holding point of the runway and took off with no remarks. After leaving the circuit, I climbed to 1500 feet while doing a right turn at 15 degrees of bank angle which already covers the climbing turn. On 1500 feet I stabilized and performed the after take-off checklist.
From 1500 feet, I climbed in a turn to the left to 2000 feet where I noticed the weather becoming somewhat worse in the west. I decided this can be a problem if being in the air for an hour but not for a very short flight of this.
At 2000 feet, I noticed some (few) clouds being not that much higher than me flying, worse than the METAR told us, so I decided to make a decending turn over right and stay at 1500 feet to be clear of the clouds. Then I saw the weather on the right becoming worse and decided to fly back to the aerodrome. Before entering the traffic circuit/pattern, I again had to descend and did this over left, so I did both exercises over the left and right side.
I re-entered the circuit with much less traffic this time and made a stable circuit with great turns. During the circuit my plan was to do one touch and go, but on the end of downwind, some rain started falling down, so I decided to change that decision to a full-stop. I also called out being on base as some traffic was already on the holding point, keeping them sharp and telling I’m inbound.
Then I landed the plane in a better way than in the Solo 2 flight, but room for improvement. After landing and parking the plane, an unknown man came to me and asked which flight I did and told me and my instructor that he was behind me and I was doing a great job. For me this made my day. Haha. Now back to the things that could be done better.
Remarks
Of course, Im a little bit of a perfectionist so every lesson has some remarks:
Getting the right flare height and amount of input
No altitude changes in turns, keep the plane on the desired altitude
More focus on actual flying as radio calls and procedures get more natural now. Example, being on final and the radio is busy? Land the plane, and dont wait to make the call. Aviate, Navigate and then if time left; communicate.
Happy with both lessons on one day. Now it feels like I’m really make some progress, especially when both flights are solo flights.
End of the page 🎉
You have reached the end of the page. You can navigate through other blog posts as well, share this post on X, LinkedIn and Reddit or return to the blog posts collection page. Thank you for visiting this post.
This page can contain a collection of personal notes, steps to remember, finished and unfinished content. Please excuse brevity.
Do not use specific information given like fuel flow, landing/take-off distances for your flights. Always refer to the POH of your exact plane for flight preparation. My information is just for references that I used.
Flight lesson 2.6 - UPRT 1
Lesson number
Lesson name
Lesson date(s)
2.6
UPRT 2
06-10-2026
The flight lesson 2.6 with name UPRT 2 is an advanced flight lesson where we learn some Upset Prevention and Recovery Training (UPRT). This means we will be trained to recognize the plane getting in a spin or spiral dive and be able to recover successfully. Getting in those situations can happen, and be better prepared and know what to do than facing this and completely lose control.
2.7 Solo 4
In this fourth solo lesson, I left the circuit/airport area to again fully fly standalone. Then I performed some more advanced exercises like slow flight and approach to stalls and full stalls and re-joined the circuit to land.
This page can contain a collection of personal notes, steps to remember, finished and unfinished content. Please excuse brevity.
Do not use specific information given like fuel flow, landing/take-off distances for your flights. Always refer to the POH of your exact plane for flight preparation. My information is just for references that I used.
Flight lesson 2.7 - Solo 4
Lesson number
Lesson name
Lesson date(s)
2.7
Solo 4
12-10-2026
The flight lesson 2.7 with name Solo 4 focusses again on basic flight procedures being alone in the cockpit. In this lesson, I’m supposed to perform these exercises at least:
Take-off
Leave the circuit
Performing Slow Flight in clean configuration (60 knots)
Performing Slow Flight in landing configuration (50 knots)
Perform a approach to stall in clean configuration
Perform a approach to stall in landing configuration (Flaps 30)
Perform a full stall in clean configuration
Perform a full stall in landing configuration (Flaps 30)
Rejoin the circuit
Make 2 landings
Make 1 flapless landing
The weather during this lesson
The weather during this lesson was beautiful, with some minor winds but an overall clear blue sky with some small cumulus clouds. The wind was variable and this was the only risk to take into account
The METAR of a close aerodrome stated:
METAR XXXX 121225Z AUTO 14008KT 090V250 9999 NCD 15/06 Q1020
METAR information
Explaination
AUTO
Automatically generated by weather station
14008KT
Wind coming from 140 degrees at 8 knots
090V250
Variable wind between 090 and 250 degrees
9999
Visibility of 10 km or more
NCD
No clouds detected (best condition on automatic weather stations)
15/06
Temperature 15 degrees celcuis, dewpoint 6 degrees, relative humidity 40%
Q1020
Air pressure calculated back to sealevel: 1020 hPa
=
End of METAR
As the runway is headed 080 (runway 08), we can expect a pretty 8 knots of crosswind which I will describe at the end of this lesson in detail.
Flying the Solo 4 lesson
We started the lesson with a quick briefing of all the exercises that needed to be done. I got a list on paper which I could check off when in the air and flying the exercises step by step which I did. We first did 3 circuits to refresh the feeling of controlling an airplane again, which is a great thing I want to keep in the rythm for now.
The first landing I was too hard on touchdown and a little ballooning, resulting in myself deciding to go around which my instructor agreed on. The second landing was much better as I refreshed the good altitude to flare on and almost went butter smooth. On the third landing, we decided to try a flapless landing as this is also an exercises that needed to be refreshed. Flapless landings will be done at much higher speed, needing way more runway. On our case twice as much as our speed was a little high but the landing itself went great.
Then the instructor got out and I was out there alone in the plane, again. Yay.
The solo exercises
I will dive deeper in all the exercises I had to do, and will write down what went good and what can be enhanced further to learn from this experience. I took off, left the circuit and climbed to 2.500ft. This is a good altitude for performing stalls and slow flight, and I wanted to be on a nice and round number. After I left the aerodrome circuit, I also connected to the flight information services (DutchMillInfo) to have that experience once again.
Slow Flight - Clean
I started the Slow Flight exercise by doing it in the clean configuration. This means getting yourself at your desired altitude and keeping that altitude while flying in a higher angle of attack. To fly slowly, we need less thrust but to counter-act the loss of lift, we need to set the angle of attack of the wings higher. Then we increase the engine RPM to about 1800 RPM and keep in a steady 60 knots and I kept the plane at 2.500ft. The aileron controls become really sloppy at low speeds, almost doing nothing so directional control must be done with the rudder.
Slow Flight - Landing
Directly after the clean configuration slow flight I did the Slow Flight in the Landing configuration which is at 30 degrees of flaps. This amount of flaps increase our lift but also increase drag. This slows us down, being able to fly somewhat slower without stalling. In the landing configuration we can fly at around 50 knots, which is around 90 km/h. This sounds fast but being up in the air, it looks like you are going like 20 km/u.
On a scale of 1 to 10, I give myself an 8/10 for these Slow Flight exercises. It went great, but could have done better at keeping the airspeed steady, which fluctuated between 55 and 65 knots in the clean configuration at first but stabilized good by setting the correct pitch attitude and RPM.
Approach to stall - Clean
In the approach to stalls I flew at almost the critically low airspeed. This can be seen as a very unstable slow flight, changing into a stall if not corrected. In the approach to stalls in clean configuration, we have to fly at around 50 knots which is the end of the green arc and recover from this situation when one or more of these sympthoms happen:
Buffeting, aerodynamic shaking
The stall horn telling us that a stall is imminent
End of the green arc
Approach to stall - Landing
In the approach to stalls I flew at almost the critically low airspeed. This can be seen as a very unstable slow flight, changing into a stall if not corrected. In the approach to stalls in landing configuration which is flaps 30, we have to fly at around 40 knots which is the end of the white arc and recover from this situation when one or more of these sympthoms happen:
Buffeting, aerodynamic shaking
The stall horn telling us that a stall is imminent
End of the white arc
I think that the approach to stalls exercises went great, in both cases the stall horn was the first sympthom to happen and corrected it by only unloading the wings. My instructor told me to try and recover the stalls with only the pitch attitude which we done earlier in the stalls lessons.
I give myself a 10/10 for these exercises. I needed some time to think of anything I could done better but sometimes you do something exactly as intended and this was one of that cases.
Full stall - Clean
In the full stalls I needed to deliberately worsen the pitch attitude, resulting in a full stall. We don’t have symthoms anymore telling us that a stall is coming, we are in a stall and direct action is needed.
Symthoms of a full stall in are:
Wing drop
Nose drop
Altitude loss
So I started setting the engine to idle, still at 2.500ft and pushing to keep it at 2.500ft. The airspeed quickly drops all the way to around 50 knots and the stall horn beeped like crazy. In the stalls lesson I accidentally wanted to recover drops with the ailerons as natural reaction. So during the exercises I kept telling myself, no aileron, no aileron, no aileron and this worked. However, I flew in a Cessna 172 and those are sometimes almost impossible to get in a full stall. I eventually got the nose to drop and where I found this somewhat scary during the actual lessons, I was laughing at how many input was needed to get the nose to drop.
Full stall - Landing
In the full stalls I needed to deliberately worsen the pitch attitude, resulting in a full stall. We don’t have symthoms anymore telling us that a stall is coming, we are in a stall and direct action is needed.
Symthoms of a full stall in are:
Wing drop
Nose drop
Altitude loss
So I started setting the engine to idle, still at 2.500ft and pushing to keep it at 2.500ft. The airspeed quickly drops all the way to around 40 knots and the stall horn beeped like crazy again. I again told myself, no aileron, no aileron, no aileron. Eventually the nose dropped again, and the work on the rudder was good in my opinion. Great thing in those exercises is to have a outside reference point, which was some reflection about 30 miles away. The only thing you need to do is keep that in the same spot and your directional control will also be good.
I repeated this exercises about 2-3 times to get the hang of it, and I give myself a 8/10 for these exercises. Directional control was great, but some room for improvement at keeping the same altitude. I fluctuated between 2.400 ft and 2.700 ft but was good on the recovery actions where I did not lose too much altitude where I did at the stalls lesson some experiences ago.
Small break
As I had to fill a remaining time window of 20 minutes from my previous lesson, I had to add this time to my lesson today if possible. After the exercises I took a small break of around 10 minutes, descending to 2.000ft and enjoying our beautiful country from above. This was one of the major reasons to fly airplanes anyway. I made a large circle, just to head back to my starting aerodrome and going back to full business, as making circuits can be quite exhausting after a few. Much checks, RT calls and stuff to be done in short time while also keeping other traffic in mind.
Landing(s)
After the small break I headed back to the circuit joining point after announcing I’m inbound. I completed the circuit with no problems all the way to final. However, on Final I noticed that the winds were somewhat stronger than before, making a landing a bit harder. I got to the ground and exactly the same as in the first landing of today with instructor, I made a bounce, ballooned too much and needed to go around. I felt somewhat stupid but after an hour in the air it can happen. Maybe correction was enough but better safe than sorry.
Then I circled the circuit, repeating all checks and procedures as learned and again, on final I experienced some windshear causing the airspeed indicator to fluctuate a lot. When almost on final I was a bit high and the wind working against me so I went around without even touching the ground.
Third attempt then, noticed the winds coming from a 80 to 90 degrees angle and with variable speed, so I decided to use flaps 20 instead of 30 and to add 5 knots on every speed known, so 85 on downwind, 80 on base and 70 on final. Less flaps gives us less drag resulting in more speed, and less attacked by the winds. I touched down and it looked promising at first but did not apply the full crosswind correction, where the wind almost pushed me of the runway. As in a flash I anticipated that I couldn’t make it back on the runway without major inputs I again decided to go around.
Then I did a fourth attempt where I got to the runway, again with flaps 20 and corrected for the crosswind in an OK manner but not enough. I again ballooned too much as I did not correct for the higher speed I got, something we did not actually practice much. After ballooning too much I though touching down too hard and went for another, 4th go around. This seems very stupid, but I see this as assessing the situation, trying some things and then combining all the good things into an approach which works.
So, here I go on the 5th attempt. I thought in myself of a gameplan:
Crabbing on final
Flaps 20
Crosswind correction, winds coming from the right (left rudder, right aileron)
Flare as long as possible but not too much nose up input
And then I pulled of a (in my opinion) great landing, even with 8 knots of crosswind. I made a small bounce but the second touch was perfect and I rolled out all the way to the end of the runway. My instructor told me that the landing itself was very good. After coming to a stop and having some landings left to do, I finished the lesson myself as landing in 8 knots of crosswind is relatively hard without experience.
So altough I could have done much better, I could have seen and felt the crosswind the first go around and have done better on the second landing. I think the story is two sided, maybe the crosswind was a little to hard on a fourth solo flight but I could have done better myself but was a little bit suprised by the windshear on final.
I want to split the grade into two:
Landings: 4/10
Decision making: 7/10
Altough you can always experience slightly different situations as predicted and measured by nearby weather stations, this was a good lesson for me. Do a better assessment of the situation and how to fly it correctly. I skipped the other landing and flapless landing as I was somewhat happy to be on the ground. I and my instructor agreed on taking more crosswind landing lessons when the situation is again like this.
2.10 Precautionary landing
In this lesson we performed the Precautionary landing exercise, performed when in minor trouble like fuel problems, leaks, end of daylight period or a sick passenger on board.
This page can contain a collection of personal notes, steps to remember, finished and unfinished content. Please excuse brevity.
Do not use specific information given like fuel flow, landing/take-off distances for your flights. Always refer to the POH of your exact plane for flight preparation. My information is just for references that I used.
Introduction
Lesson number
Lesson name
Lesson date(s)
2.10
Precautionary landing
21-09-2026
In this lesson, we performed the Precautionary Landing exercise. This is a separate exercise from the other lessons we did till now, and focusses on to land the aircraft in a moderate controlled way outside of any aerodrome but in a field. As we still have our engine, primary and secondary flight controls, we are less dependent on those critical factors.
Causes of you having to perform a precautionary landing are often to save lives without any aerodrome in range while still having an engine and flight controls:
Fuel miscalculation or suspected fuel leak
Sick passenger on board
End of daylight period and/or planned aerodrome(s) closed
Lost in the vicinity, no contact with GPS, other aircraft
Unplanned weather deterioration, or getting not suitable for VFR conditions
The weather during this lesson
Today we had a great day for flying in terms of visibility, clouds and precipitation but the winds were very variable. We had a variable wind between 230 degrees and 020 degrees, and about 7 to 11 knots. The METAR of a close airfield, which are the actual measures reported this:
METAR XXXX 211355Z AUTO 30010KT 230V020 9999 SCT041 19/09 Q1030=
Let’s extract this information:
METAR information
Explaination
AUTO
Automatically generated by weather station
30010KT
Wind source: from 300 degrees (to 120 degrees) with a speed of 10 knots
230V020
Wind variable between 230 degrees and 020 degrees
9999
Visibility: 10 kilometres or more
SCT041
Scattered clouds (3/8 to 4/8 coverage) at 4.100 ft above the ground (AGL)
19/09
Temperature (19) and dew point (09) in degrees celcius (52% humidity)
Q1030
Air pressure at sea level: 1030 hPa
=
End of METAR
Enough about the weather, let’s dive into the exercise.
The exercise explained
So the Precautionary landing exercise is somewhat different from the Forced Landing exercise, as we still have our engine and our primary/secondary flight controls. As we have this, we can make a landing in a much safer way than just putting it what is within our gliding range and wants us to first do an inspection run of the chosen field.
During the inspection run, we will fly at a constant speed of around 70 knots and count how long it takes from start to end of the field. This tells us by a rule of thumb how long the field is so we can decide to land there. We check the following things during this run:
Time from start to end
Trees, power lines
Field material (softness, condition)
Cattle/animals
Objects at the start and end of the field
Other possible risks
Info
As we can count the time from start to end at around 500ft, we can use this rule of thumb to get an indication (not exact) of the available landing distance:
Indicated airspeed : 2 x seconds = distance traveled
__
This means, traveling 100 knots in 10 seconds is 500 meters, 62 knots in 20 seconds is 620 meters. The amount of knots devided by 2 is meters per second.
The exercise looks like this, where I have added the several steps:
So we fly 2 circles around the field, first to inspect and then to prepare and land like a normal circuit. Then we perform a soft field landing. On the last downwind, we could make use of our radio capability to inform the tower or flight information services that we need medical assistance. This can result in having that assistance minutes earlier.
Remarks
So we have performed this exercise around 3 times in this lesson. It went not perfect but also not bad. I chose the right fields to land on, preferably into the wind which gives us less ground roll. The first time, I was not perfect on speed with flaps 20 and with 10 knots of wind so I was corrected. The second and third time were much better and the third time actually having a good approach to the field with good speed.
After 3 times, we headed back to the airfield for 3 circuits with crosswind with okay landings but crosswind flying and landings are a good training area as this requires much more precise flying.
End of the page 🎉
You have reached the end of the page. You can navigate through other blog posts as well, share this post on X, LinkedIn and Reddit or return to the blog posts collection page. Thank you for visiting this post.
This lesson is not a real flight lesson but a grounded theory lesson on how to navigate properly using different checkpoints on a map and be able to write and maintain a navlog/flight plan.
This page can contain a collection of personal notes, steps to remember, finished and unfinished content. Please excuse brevity.
Do not use specific information given like fuel flow, landing/take-off distances for your flights. Always refer to the POH of your exact plane for flight preparation. My information is just for references that I used.
Flight lesson 2.12 - Navigation Ground School
Lesson number
Lesson name
Lesson date(s)
2.12
UPRT 2
06-10-2026
The flight lesson 2.12 with the name Navigation Ground School is a non-flying lesson but a deep dive into how to navigate using checkpoints. We can see this as a practical extension of the PPL Theory for Navigation which I passed around a year ago (https://flightblog.justinverstijnen.nl/ppl-theory-nav/)
Navigation goals
The goal of this lesson is that I am prepared to do on my own:
Choose a good and recognizable navigation plan with nav log with obvious points on the ground
Actually being able to perform the planned route
Reconsider the route at any checkpoint in case of being lost or diverted
Perform the flight planning with fuel, mass and balance calculations and take-off/landing distances
The Navigation Log
The navigation log which we will fill with our checkpoints and maintain during flight looks something like this:
Meaning
Route / Remarks
Write the checkpoint here with possible radio frequencies
Safe Altitudes
Safe altitudes, between MOCA* and possible upper limits
Flight Time - INT
Interval flight time (Checkpoint time)
Flight Time - ACC
Accumulated flight time (Total time)
ETO
Estimated time to Overhead Checkpoint
ATO
Actual Time Overhead Checkpoint
RETO
Rectified ETO, used when ETO and ATO has a big discrepancy
ALT
The planned altitude, if deviated we can add an arrow pointing up or down